How to Get an eSIM and Say Goodbye to Roaming Fees
Getting an eSIM for your trip is way easier than it sounds. It really just boils down to three quick steps: first, make sure your phone is eSIM-compatible, then buy a data plan that fits your travel style, and finally, activate it with a QR code before you even pack your bags.
This whole process is digital, which means you can have internet access the second you land, sidestepping those notoriously expensive roaming fees from your home carrier.
Your Quick Guide to Getting a Travel eSIM
Making the switch to an eSIM is, without a doubt, the smartest move for any traveler who wants to stay connected without fiddling with tiny plastic SIM cards. It's your ticket to affordable, instant data in a new country. No more hunting for a local SIM store at the airport or coming home to a shocking phone bill.
The entire setup is done from your phone, usually in just a few minutes. Let's walk through what that looks like.
Breaking Down the eSIM Setup Process
Before we get into the nitty-gritty, it's helpful to see the big picture. You don't need to be a tech wizard to do this—it's just a simple sequence of checks and clicks you can do right from your couch.
- The Compatibility Check: This is the first and most important step. You just need to confirm your phone—whether it's a recent iPhone, Google Pixel, or Samsung Galaxy—actually supports eSIM technology. A quick Google search of your model will tell you what you need to know.
- Picking Your Plan: Next up, you'll choose a data plan that makes sense for your trip. This could be a 5 GB plan for a week-long city break in Japan or a 30-day regional plan that covers you all across Europe.
- The Activation: The final piece of the puzzle. This is where you install the digital SIM profile onto your device, which almost always just involves scanning a QR code that gets emailed to you.
This visual breaks it down even simpler:
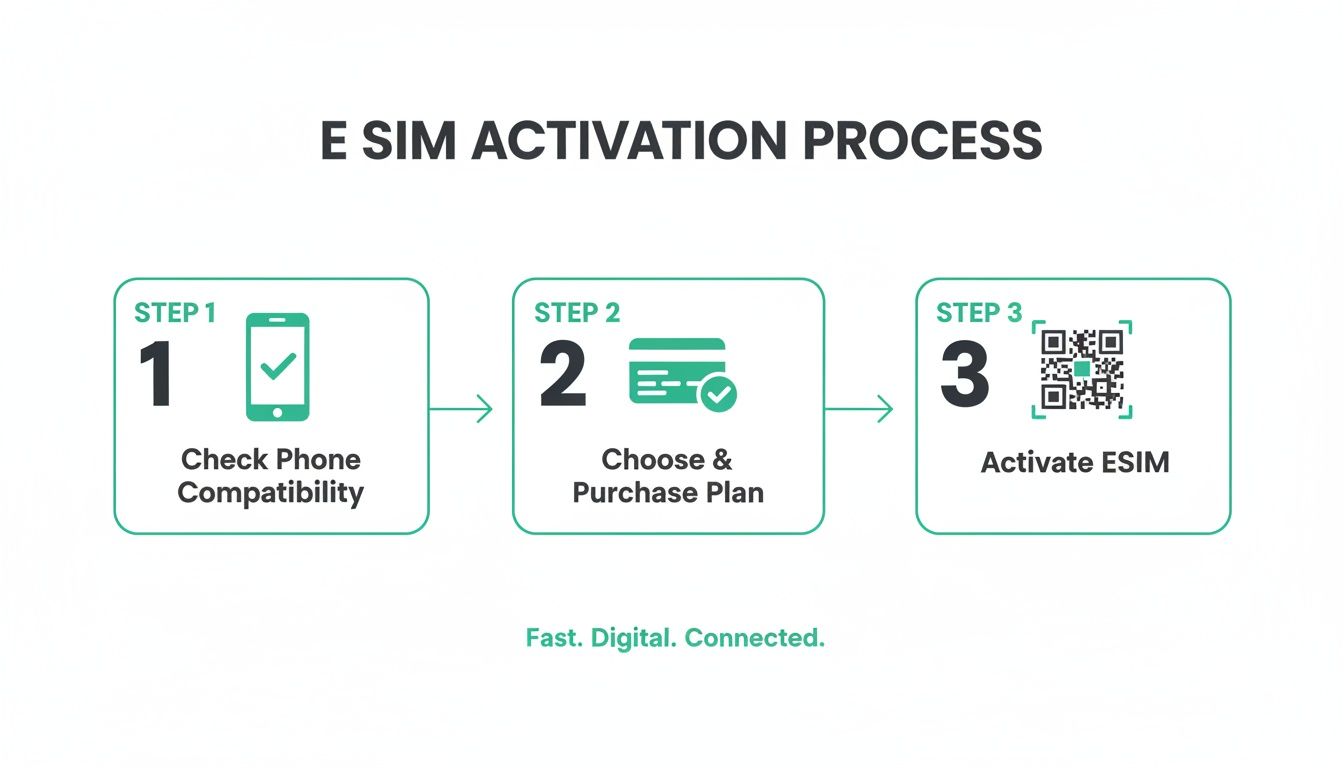
As you can see, getting from point A to point B is straightforward and designed for anyone to follow.
The real magic of an eSIM is that you get everything set up before you leave home. This means you can step off the plane, switch on your eSIM data line, and immediately order a rideshare or pull up Google Maps without a second of stress.
Now, you have a few different avenues for actually buying that eSIM. You can go straight to a provider, use a marketplace that compares options, or even see what your home carrier offers. Let's look at the pros and cons of each.
Three Ways to Get Your Travel eSIM
Choosing where to buy your eSIM can impact everything from price to plan selection. Here's a quick comparison of the most common ways to get one, helping you decide which route is best for your travel needs.
| Method | Best For | Pros | Cons |
|---|---|---|---|
| Directly from a Provider | Travelers who know what they want and value a direct relationship with the company (e.g., Airalo, Holafly). | Often has the best app experience, loyalty programs, and dedicated customer support. | Might not have the absolute lowest price; plan selection is limited to that single provider. |
| eSIM Marketplaces | Price-conscious travelers who want to compare multiple providers and find the best deal for a specific destination. | Huge variety of plans and providers in one place; easy to find the cheapest option. | Customer support can be hit-or-miss as you're dealing with a middleman; app quality varies. |
| Your Home Carrier | Travelers who prioritize convenience and don't mind paying a premium for an integrated experience. | Super simple to add an international plan to your existing account; billing is consolidated. | Almost always the most expensive option; data allowances are often less generous. |
For most people, starting with a provider's app or a marketplace is the sweet spot between cost and convenience. Unless your company is footing the bill, your home carrier's international plans are rarely the best value.
While an eSIM is fantastic for data, it's also smart to know about other ways to stay in touch. For example, it’s worth learning how to call without a SIM card for even more flexibility. And for more tips on keeping your phone bill down, be sure to check out our guide on https://esimguide.com/blog/how-to-avoid-roaming-charges.
First, Check if Your Phone Is eSIM Ready
Before you even start shopping for a data plan, the absolute first thing you need to do is confirm your smartphone is compatible with eSIM. This is a critical checkpoint. It sounds technical, but it’s actually a breeze, and getting it right from the start will save you a world of frustration later on.
The good news? Most smartphones released since 2018 have this capability baked right in. Big names like Apple, Samsung, and Google have been including eSIM technology as a standard feature for years, so it's far more common than you might think. Apple even made the leap to remove the physical SIM tray entirely from its U.S. iPhone 14 models and newer, making eSIM the only way to connect.
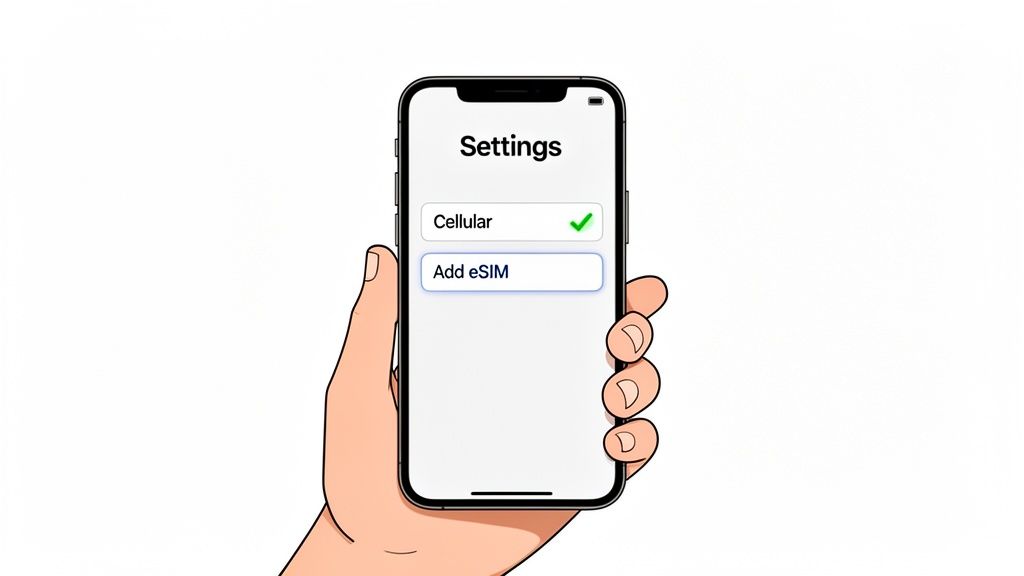
How to Check eSIM Compatibility on an iPhone
Finding out if your iPhone is ready for an eSIM is incredibly simple and takes less than a minute. You can do it right from your settings—no need to Google model numbers.
Here’s the fastest way to check:
- Open your Settings app.
- Tap on Cellular (or Mobile Data in some regions).
- Look for an option that says Add eSIM or Add Cellular Plan.
If you see either of those, you're good to go. It’s that easy.
Another spot to look is in Settings > General > About. Scroll down and you'll see a section for "Digital SIM." If an eSIM is already active, you'll see an ICCID number. If not, the presence of an EID (Embedded Identity Document) number confirms the phone has the necessary chip.
How to Find eSIM Support on an Android Phone
For Android users, the process is just as straightforward, though the exact menu names might differ a bit depending on who made your phone (like Samsung or Google). The goal is the same: find where your phone manages digital SIMs.
Here’s a common path to try:
- Navigate to Settings > Network & Internet.
- Tap on SIMs or a similar menu.
- Look for a plus sign (+) or an option like "Download a SIM instead?" or "Add eSIM."
Seeing any of those is your green light. The presence of an EID number in your phone's status information is another dead giveaway that you're compatible. Think of the EID as the unique serial number for your phone's embedded SIM chip. You might occasionally need it for a manual activation, but most of the time, you'll just be scanning a QR code.
Key Takeaway: Don't get bogged down in the technical jargon. If your phone's settings let you "Add eSIM," you have everything you need. This simple check ensures you won't waste time or money on a plan you can't use.
Why This Technology Is Becoming the Standard
Confirming device compatibility is only getting easier as eSIM technology explodes in popularity. In fact, shipments of eSIM-enabled devices are projected to rocket past 633 million units by 2026. This growth is overwhelmingly driven by smartphones, which are expected to make up 74% of those shipments as massive markets like China begin to adopt the tech more widely.
This massive industry shift means that checking for eSIM support will soon be a thing of the past—it’ll just be a given. For a more detailed walkthrough, you can check out our guide on how to tell if your phone supports eSIM.
Choosing the Perfect eSIM Plan for Your Trip
Alright, you've confirmed your phone is eSIM-ready. Now comes the part where you can save some serious cash and avoid those dreaded roaming charges. Picking the right plan isn't just about grabbing the cheapest deal you see—it's about matching the data, coverage, and trip length to how you actually travel.
You’ll find travel eSIMs in three main places: directly from a provider, through a marketplace, or from your carrier back home. Each has its ups and downs, and the best fit really depends on what you value most.
Where to Buy Your Travel eSIM
Deciding where to get your eSIM is your first big decision. Are you loyal to a specific brand, hunting for the absolute lowest price, or just want the simplest option by sticking with who you know?
Let's break down where you can get an eSIM and why you might choose one over the other.
eSIM Purchase Options Compared
| Purchase Source | Price Competitiveness | Plan Variety | Convenience | Ideal Use Case |
|---|---|---|---|---|
| Direct Provider | Good to Great | Limited to one brand | High (dedicated app) | Travelers who find a brand they like and stick with it for loyalty perks. |
| eSIM Marketplace | Excellent | Very High | High (one-stop shop) | Price-conscious travelers who want to compare the market for the best deal. |
| Home Carrier | Poor | Very Low | Excellent (no new app) | Last-minute travelers who prioritize convenience over cost. |
Here's what that table means in the real world:
-
Direct from Global Providers: Companies like Airalo or Holafly offer their own apps and plans. This is a great route if you value a clean, consistent experience and want to rack up loyalty points. The obvious catch is that you're limited to only their plans.
-
eSIM Marketplaces: Think of these as the Kayak or Skyscanner for eSIMs. They pull in offers from dozens of providers, letting you compare them all in one place. This is hands-down the best option for bargain hunters who want to find the cheapest plan for their destination.
-
Your Home Carrier: Your current provider (think Verizon or T-Mobile) will happily sell you an international roaming add-on via eSIM. While it feels easy, this is almost always the most expensive path with the stingiest data allowances.
For most travelers, buying from a direct provider or a marketplace gives you the best mix of cost, choice, and performance.
Decoding Your Data Needs
Once you know where to look, you need to figure out what to get. The key is to match the plan’s coverage to your itinerary so you're not paying for service in countries you'll never visit.
So, where are you headed? A single country, or are you hopping borders?
-
Single-Country Plans: Perfect for a week-long trip to Japan or a business conference in Germany. These plans are hyper-focused and usually offer the best value because the coverage is so localized.
-
Regional Plans: If your trip involves bouncing between countries in the same area, a regional plan is a game-changer. A "Europe" eSIM, for example, will keep you connected as you go from France to Italy to Spain without you having to lift a finger.
-
Global Plans: For the serious globetrotters or anyone with a complex, multi-continent itinerary. They cost more, but they completely eliminate the headache of managing different eSIMs for every leg of your journey.
The real trick to saving money is buying only the coverage you need. A regional plan for a two-week backpacking trip through Southeast Asia is far more cost-effective than buying individual country plans for Thailand, Vietnam, and Cambodia.
Calculating How Much Data You Actually Need
This is where travelers often get stuck. It’s tempting to buy way too much "just in case," but it's even worse to run out of data when you’re trying to navigate back to your hotel.
Start by thinking about your daily habits. Are you a light browser or a heavy streamer?
- Light User (1 GB for 7 days): You stick to the essentials—Google Maps, WhatsApp, and maybe some light web browsing. You’re happy to use the Wi-Fi at your hotel or a local café for bigger stuff.
- Medium User (3-5 GB for 7 days): This is most people. You do all the basics, plus scroll through Instagram, stream music on Spotify, and watch a few YouTube videos.
- Heavy User (10+ GB for 7 days): You’re working remotely, taking video calls, tethering your laptop to your phone, and streaming Netflix before bed.
Pro tip: Always check if the provider’s app lets you top up your data easily. Knowing you can add more on the fly means you can start with a smaller, cheaper plan and only pay for more if you actually need it. To really dive deep, you can check out our detailed guide to the best eSIMs for international travel.
The global eSIM market is exploding and is projected to hit $19.2 billion by 2026. This incredible growth fuels competition, which means better deals and more options for us travelers. With some estimates suggesting eSIMs already power 15% of all travel connectivity, using comparison tools is becoming essential to cut through the noise and find the best value out there.
Activating Your eSIM Before You Fly
You’ve bought your plan, and now for the easy part—getting it on your phone. Activating an eSIM is a quick, all-digital affair you can knock out from your couch with a Wi-Fi connection. Say goodbye to fumbling around for a paperclip to pop open a SIM tray. The whole thing takes less than five minutes and means you’re connected the second you land.
Most providers give you three straightforward ways to get your new data plan up and running. Scanning a QR code is the most common by far, but manual entry and in-app activation are great alternatives, too.
The Three Paths to eSIM Activation
Which method you use usually comes down to your provider and personal preference. Don't worry, all three get the same job done: installing the eSIM profile on your device.
- QR Code Scan: This is the industry standard. Your provider emails you a QR code right after you pay. Just point your phone's camera at it, and the installation process kicks off automatically.
- In-App Activation: Top-tier providers like Airalo have slick apps that do the heavy lifting for you. If you buy your plan through their app, you can often just tap a button that says "Install eSIM" and you're good to go.
- Manual Entry: If for some reason you can’t scan the QR code (maybe your camera is busted or you're on the same device), your provider will also give you details to type in yourself. These are the "SM-DP+ Address" and an "Activation Code."
This is the kind of simple, digital process that’s making physical SIM cards feel ancient. Adoption is skyrocketing, with global eSIM connections expected to hit 1.5 billion by 2026. Activation rates in compatible devices already jumped to 30% in 2024, and analysts predict this will climb to 75% by 2030 as more people "discover eSIM on travel and never go back." For our readers at eSimGuide.com—from backpackers to remote workers—the setup takes just minutes. You can check out more on these trends in a study from Tinside.com.br.
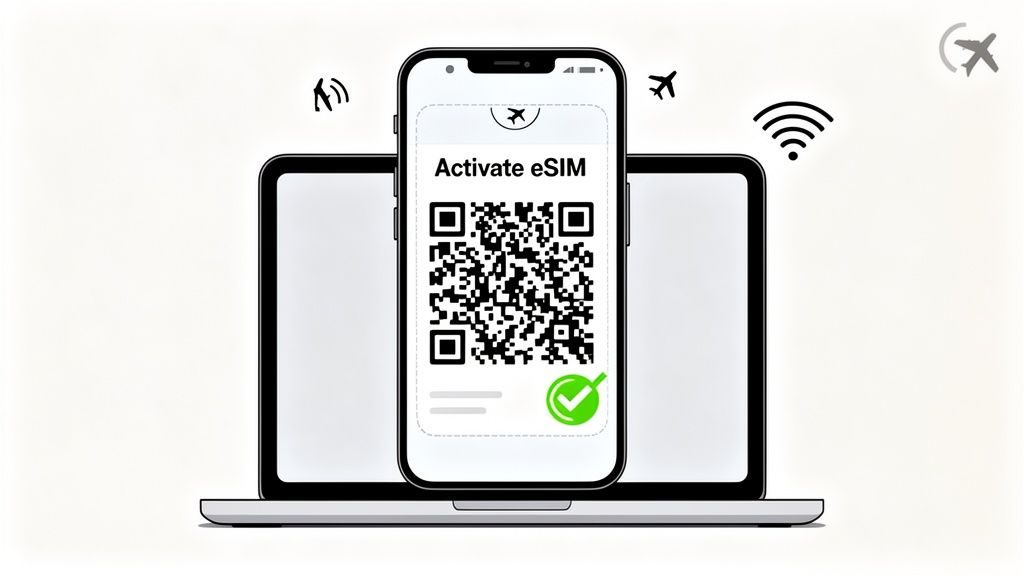
Step-by-Step Activation on iOS Devices
Getting an eSIM working on an iPhone is incredibly simple. The only thing you really need is a stable Wi-Fi connection to get started.
Using a QR Code:
- Head to Settings > Cellular > Add eSIM.
- Tap Use QR Code.
- Point your camera at the QR code. It’s way easier if you have the code displayed on another screen, like a laptop or tablet, instead of trying to juggle it on one phone.
- Follow the prompts to finish the installation.
Using Manual Details:
- Go to the same Add eSIM screen.
- At the bottom, tap Enter Details Manually.
- Carefully copy and paste the SM-DP+ Address and Activation Code from your provider's email.
Once it's installed, your iPhone will ask you to label your new eSIM. This is a small but critical step for staying organized.
Step-by-Step Activation on Android Devices
The process on an Android phone is pretty much the same, though the exact menu names can change a little depending on who made your phone (like Samsung vs. Google Pixel).
Using a QR Code:
- Go to Settings > Network & internet > SIMs.
- Tap the plus (+) sign or the Add eSIM button.
- Choose Scan QR code and point your camera at it.
- Your phone will walk you through the last couple of confirmation steps.
Using Manual Details:
- On the QR code scanning screen, look for an option like Need help? or Enter it manually.
- From there, you’ll be prompted to type in the activation code from your eSIM company.
Pro Tip: Don't activate your plan's data package until you actually arrive. Installing the eSIM just gets the profile onto your phone. The data plan's clock usually starts ticking only when it first connects to a network in the destination country.
Finalizing Your Setup for a Smooth Arrival
Just installing the eSIM isn’t quite the last step. To make sure you get a seamless connection the moment you land, you need to tweak a few settings. Taking a minute to do this at home saves you from scrambling on the airport tarmac.
First, give your new eSIM a sensible name.
- Go into your phone’s cellular or SIM settings.
- Select the new eSIM profile.
- Change its label from a generic name like "Secondary" to something you'll actually recognize, like "Italy Data" or "Europe Trip." This makes it obvious which line is which.
Next, tell your phone what to use it for. You’ll want your travel eSIM for mobile data, but keep your primary number active for calls and texts.
- In your cellular settings, find the Mobile Data (or Cellular Data) option.
- Switch it to your newly labeled travel eSIM.
Finally—and this is the most important part—make sure data roaming is turned on for your travel eSIM. Unlike with your home plan where roaming costs a fortune, travel eSIMs are designed to work with roaming enabled.
- Select your travel eSIM in the settings menu.
- Find the toggle for Data Roaming and make sure it is switched ON.
With those settings locked in, all you have to do when the plane touches down is make sure your phone is set to use your travel eSIM for data. You'll be online before you even get to baggage claim.
Troubleshooting Common eSIM Installation Issues
While getting an eSIM up and running is usually a breeze, technology doesn't always play nice. You might find yourself staring at a QR code that refuses to scan or landing in a new country only to see "No Service" glaring back at you. Don't panic—these hitches are almost always minor and easy to fix.
Most installation problems come down to a few usual suspects, like a shaky Wi-Fi connection during setup or a single setting you forgot to toggle. Let's walk through the most common issues so you can get your travel data working and get back to enjoying your trip.
When the QR Code Fails to Scan
It's a classic snag. You point your phone's camera at the QR code, and... nothing. It’s frustrating, but the fix is usually pretty straightforward.
Before you start over, run through this quick checklist. The problem is often just your camera or the quality of the image itself.
- Clean Your Screen: Give the screen displaying the QR code (your laptop or tablet) a quick wipe and turn up the brightness. A smudge or screen glare is often enough to confuse your phone's camera.
- Zoom In a Bit: If the QR code is too small, your phone might have trouble focusing. Try zooming in on the image so it fills more of your camera's viewfinder.
- Try a Different Display: Sometimes the easiest fix is switching screens. If you're trying to scan the code from an email on your phone, pull up that same email on a laptop and try again.
- Go Manual: If the QR code is being truly stubborn, just switch to manual activation. Your provider always includes the SM-DP+ Address and Activation Code for you to type in directly.
Solving the Dreaded "Installation Failed" Error
You scanned the code, everything looked good, and then your phone hits you with an "Installation Failed" or "Unable to Add Cellular Plan" message. This almost always points to a problem with your connection or device, not the eSIM itself.
To download an eSIM profile, a stable internet connection is non-negotiable. The very first thing you should do is make sure you're on a strong Wi-Fi network—don't even bother trying this on spotty airport Wi-Fi.
If your connection is solid, a few classic tech fixes usually do the trick.
- Restart Your Phone: It’s a cliché for a reason. A simple reboot can clear temporary glitches that are blocking the installation.
- Update Your Software: Make sure your phone's operating system is up to date. An older OS can sometimes have compatibility issues with newer eSIM profiles.
- Disable Your VPN (Temporarily): If you have a VPN running, it can interfere with the connection to the activation server. Just turn it off for the installation, and you can turn it back on later.
A quick heads-up: most travel eSIM QR codes are single-use. If the installation fails, don't delete the partially installed profile to try again. Work through these troubleshooting steps first to avoid locking yourself out.
What to Do When You Have No Network After Landing
This is probably the most stressful scenario. You land, you switch on your new eSIM, and you're met with "No Service." You followed all the steps, but your phone just won't connect to a local network.
Nine times out of ten, this comes down to a couple of critical settings that need to be enabled for your travel eSIM to work abroad.
- Turn on Data Roaming: This is the #1 culprit. Travel eSIMs need data roaming enabled to connect to partner networks in other countries. Dive into your phone’s cellular settings, tap on your travel eSIM, and make sure the Data Roaming toggle is switched ON.
- Check Your APN Settings: Occasionally, a phone won't automatically configure the Access Point Name (APN). Your eSIM provider will list the correct APN in their instructions (it's often a single word like "internet" or "globaldata"). Double-check that it matches what's in your phone's cellular data settings.
- Select a Network Manually: Your phone should automatically find a local carrier, but sometimes it needs a little nudge. In your cellular settings, find "Network Selection," switch it from "Automatic" to manual, and pick one of the available local networks from the list.
Pro Tips for Managing Your eSIM While Traveling
Getting your eSIM installed is just the first step. Knowing how to actually manage it on the road is what separates a smooth trip from a frustrating one. Think of your eSIM less as a one-and-done purchase and more as a flexible tool you can adapt as your travel plans change.
These are the tips I’ve picked up over the years to help you travel smarter and stay connected without the usual headaches.
Juggling eSIMs for Multi-Country Trips
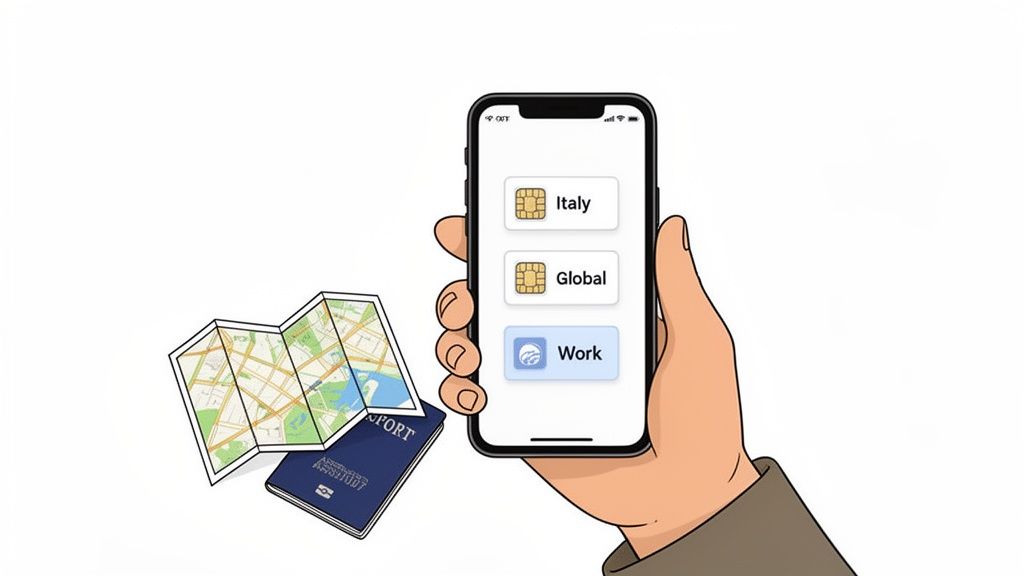
Most modern phones can store multiple eSIM profiles at once—often five or more. This is an absolute game-changer for multi-country trips. Before you even pack your bags, you can buy and install an eSIM for each country on your itinerary.
Imagine you're flying into Madrid and then taking a train to Lisbon a few days later. You could have a "Spain Data" eSIM and a "Portugal Data" eSIM loaded on your phone before you leave home.
When you land in Spain, just pop into your phone's cellular settings and flip on the Spain eSIM. Once you cross into Portugal, you switch the Spain one off and the Portugal one on. It’s that simple. No more hunting for airport Wi-Fi to download a new plan mid-trip.
Keeping Your Data Flowing
It's really important to know whether your eSIM is a one-time plan or if it's rechargeable. The good news is that most prepaid travel eSIMs are rechargeable, which means you don't have to install a whole new profile just because you ran out of data.
Instead, you just open your provider's app and buy a top-up. It's incredibly convenient. Say you're about to run out of data while trying to navigate the Tokyo subway. With a provider like Airalo, you can add another 5 GB with a few taps in their app, and it activates on your existing eSIM almost instantly.
Pro Tip: Always check if your provider offers an easy top-up feature. This lets you buy a smaller, cheaper plan to start with, knowing you can easily add more data if you find yourself using more than you expected.
Staying on Top of Your Usage
Don't get caught by surprise with a "no data" notification. Get in the habit of checking your consumption every day or two. While your phone's built-in settings give you a rough idea, your eSIM provider's app is your source of truth—it’ll show you exactly how much data you've used and what's left. Some will even ping you with a low-data warning.
Once your trip is over, it’s good practice to do a little digital housekeeping. Go into your phone’s cellular settings and delete any old or expired eSIM profiles. This keeps things tidy and makes it easier to manage your active lines for the next adventure. Just be careful—once you delete an eSIM, it's gone for good and can't be recovered.
Your eSIM Questions Answered
Once you get the hang of eSIMs, they’re incredibly simple. But if you’re just starting out, a few questions always seem to come up. Let's clear up the common ones so you can travel with total confidence.
The biggest question I hear is, "Will my regular phone number still work?" The answer is a resounding yes. Nearly all modern smartphones have Dual SIM capability, which is the magic that makes this possible. You can keep your primary number active for calls and texts while using your new travel eSIM exclusively for data.
It's the best of both worlds. You stay reachable on your normal number for important calls or two-factor authentication texts, but you avoid those shocking data roaming bills. You can manage all of this right in your phone’s cellular settings.
Common eSIM Questions
Here are a few other things travelers often ask when they're getting their first travel eSIM.
-
When should I install my eSIM? Always do it before you leave home. The installation process needs a solid internet connection, which your home Wi-Fi is perfect for. Once it's installed, you just keep it turned off until you land at your destination. Then, it's as simple as flipping a switch in your settings to activate it.
-
What if I accidentally delete my eSIM? Be really careful with this one. Most eSIM QR codes are single-use. If you delete the eSIM profile from your phone, you almost certainly won't be able to reinstall it. You’ll have to contact customer support, and more often than not, their only solution is for you to buy a new plan.
Your primary line can remain active for receiving important calls or authentication texts, while your travel eSIM handles all the heavy lifting for maps, browsing, and social media. This dual functionality is one of the biggest perks of using an eSIM.
Ready to find the perfect data plan for your next adventure? At eSimGuide.com, we compare plans from over 22 providers in 233+ destinations to help you find the best deal instantly. Stop overpaying for roaming and start traveling smarter.