How to Install eSIM on iPhone Your Ultimate Travel Guide
Getting your eSIM set up on an iPhone is surprisingly simple—most of the time, it's just a matter of scanning a QR code. Just head to Settings > Cellular > Add Cellular Plan, point your camera at the code your provider sent, and follow the prompts. It completely does away with fumbling for tiny plastic SIM cards.
This is a game-changer for adding a second line for work or, more commonly, grabbing a local data plan when you travel.
Your Quick Guide to iPhone eSIM Installation
If you’ve got an iPhone XS, XR, or any newer model, your phone is already eSIM-ready. This means you can add a new cellular plan from anywhere in the world, as long as you have a Wi-Fi connection.
Making the jump to an eSIM is a smart move, especially for international travel. It lets you skip the hassle of swapping physical SIMs at the airport and avoid those notoriously high roaming charges from your home carrier.
It's a trend that's catching on fast. In 2024, global eSIM smartphone penetration hit 28.9%, and that number is expected to jump to 57.7% by 2030. That massive growth tells you everything you need to know about how convenient and cost-effective they are.
Choosing Your Installation Method
While scanning a QR code is the most popular route, your iPhone actually gives you a few ways to get a new eSIM running. Each one is tailored for a different situation, whether you received a code in an email, are using a carrier’s app, or need to punch in the details yourself.
This flowchart breaks down the different options available.
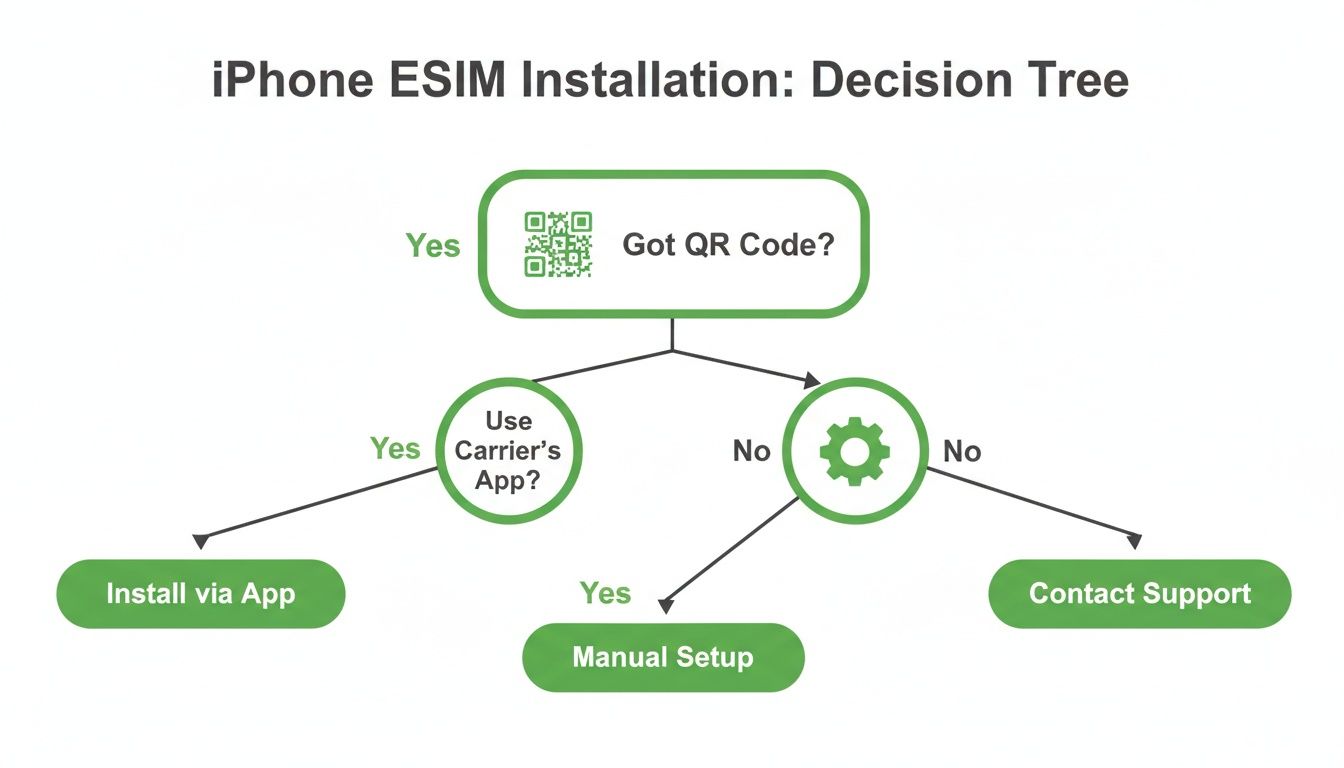
The path is pretty clear: if you have a QR code, that’s your express lane. If not, the carrier app or manual entry are solid backups.
To help you figure out which method is right for you, I've put together a quick comparison of the three main approaches.
Comparing iPhone eSIM Installation Methods
| Installation Method | Best For | What You Need | Typical Time |
|---|---|---|---|
| QR Code | Travelers and online eSIM purchases | QR code from your provider | 2-3 Minutes |
| Carrier App | In-app plan purchases from major carriers | The provider's official iOS app | 3-5 Minutes |
| Manual Entry | When a QR code isn't available or scannable | SM-DP+ Address and Activation Code | 5-7 Minutes |
Knowing these options ahead of time makes for a much smoother setup. The QR code method is hands-down the fan favorite because it's so fast and simple—perfect for getting connected the second you land.
Ultimately, knowing how to install an eSIM on your iPhone gives you a ton of freedom. If you want to dive deeper into the tech behind it, check out our guide on what is an eSIM and how does it work.
Activating Your eSIM with a QR Code
Using a QR code is easily the most common and fastest way to get an eSIM running on your iPhone, especially when you're setting one up for a trip. It’s a simple scan-and-go process that lets you download and activate your new cellular plan in a matter of minutes.
Almost every eSIM provider, including those we feature on eSIMGuide, will fire off an email with a QR code the second you complete your purchase. All you need is a stable internet connection to get it installed, which is why I always recommend doing it over your home Wi-Fi before you even think about packing. That way, your phone is ready to connect to a local network the moment you land.
Get Your iPhone Ready First
Before you jump into the settings, a little prep work makes everything go smoothly.
First thing's first: make sure your iPhone is unlocked. An eSIM you buy from a third-party provider just won't work on a phone that's still tied to your primary carrier. You can quickly check this by going to Settings > General > About and scrolling down to Carrier Lock. If it says "No SIM restrictions," you're all set.
Next, you need the QR code itself. Since your iPhone's camera will be doing the scanning, you can't have the code on the same screen you're using for setup. The easiest way is to just pull up the email on a laptop, tablet, or even a friend's phone. Printing it out works just as well.
A Quick Word of Warning: Don't just open your camera app and scan the code. It won't work. The activation has to be started from within your iPhone's Cellular settings. Scanning it from the camera will probably just take you to a generic webpage with no way to install the plan.
Walking Through the Setup
With your QR code displayed on another screen or a piece of paper, the actual installation is dead simple.
- First, head over to the Settings app on your iPhone.
- Tap on Cellular (or Mobile Data, depending on your region).
- Look for and select Add eSIM or Add Cellular Plan.
- Your iPhone will then ask if you want to transfer a plan from another iPhone or use a QR code. Go ahead and choose Use QR Code.
Your camera will pop up on the screen. Just line it up with the QR code until it registers, and your phone will take it from there. It usually takes a minute or two for it to detect the cellular plan, connect with the provider's servers, and download the eSIM profile to your device.
Labeling and Tweaking Your New Plan
Once the plan is downloaded, your iPhone guides you through a couple of final setup steps. This is where you tell your phone how to use the new eSIM alongside your primary line.
You’ll be prompted to give your new plan a custom label. This is a small but critical step for staying organized, especially if you juggle multiple eSIMs. Don't stick with the default name—give it something you’ll recognize instantly.
- Heading to Japan for a week? Label it "Japan Data."
- Adding a separate line for your business? Call it "Work Line."
- Just got a local data-only plan? "Local Data" works perfectly.
This tiny bit of effort makes it so much easier to know which line you're using at a glance.
After that, you'll need to choose a default line for calls, messages, and mobile data. For a travel setup, this is the configuration I almost always use:
- Default Line (for calls & texts): I keep this set to my primary (home) number.
- Mobile Data: Switch this to your new travel eSIM. This is the key to avoiding those nasty roaming fees.
- iMessage & FaceTime: You can leave this tied to your primary number so your contacts don't get confused.
Finally, dive into the settings for your new travel eSIM and make sure Data Roaming is turned on. At the same time, double-check that it's turned off for your primary line. This setup gives you affordable data abroad without any surprise charges on your next bill.
For a deeper dive into managing your data while traveling, our guide on eSIMs for international travel has a ton of other practical tips.
Other Ways to Set Up Your eSIM: Carrier Apps & Manual Activation
Scanning a QR code is definitely the most common way to get an eSIM running on your iPhone, but it’s not your only play. Sometimes you won't get a code, or maybe you'd just rather activate your plan directly through a carrier you already know and trust.
Fortunately, your iPhone has a couple of other great methods for getting you connected.

Activating Through a Carrier App
One of the slickest ways to install an eSIM is right through your carrier's dedicated app. Major players like Verizon, T-Mobile, and AT&T have poured a ton of effort into their apps, making them the central hub for managing your entire account. Buying and installing an eSIM is often just a few taps away, making it a nearly automatic process.
The whole thing is designed to be super straightforward. You just download the provider’s official app from the App Store, sign in, and buy the eSIM plan that works for you. Once you’ve paid, the app does the heavy lifting, sending a notification to your iPhone to kick off the installation.
You’ll see a banner pop up that says something like, “Cellular Plan Ready to Be Installed.” Tapping it takes you straight into your iPhone's settings to finish the job. It's a completely guided experience that’s perfect if you’re not comfortable scanning QR codes.
When Manual Installation Is Your Best Friend
Then there’s the manual setup, which sounds way more intimidating than it actually is. This method is a real lifesaver in a few key situations.
Imagine you just bought a travel eSIM, but instead of a QR code, the provider emails you a couple of lines of technical-looking text. That's your cue for a manual installation. This is also your go-to backup plan if your iPhone’s camera is acting up or if you just prefer a more hands-on approach.
It’s really just a matter of copying and pasting some info into your phone’s settings.
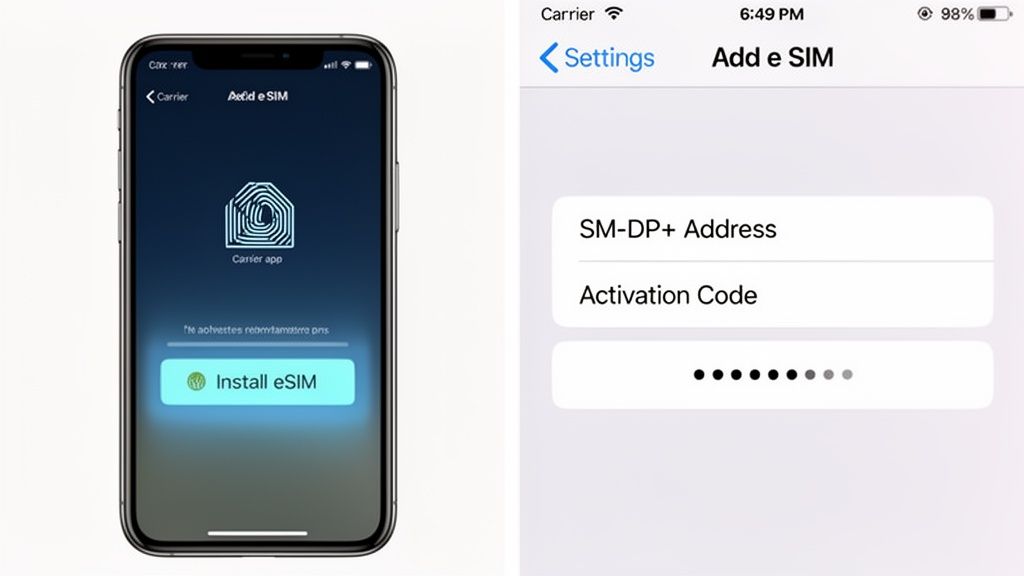
Here’s how it works. You’ll navigate to Settings > Cellular > Add eSIM. Instead of choosing the QR code option, you’ll see a button at the bottom labeled "Enter Details Manually." This is where you'll plug in the details your provider sent you:
- SM-DP+ Address
- Activation Code
Just copy each string of text from your email and paste it into the right field on your iPhone. Some providers might also give you a "Confirmation Code," which you can add if you see a field for it.
Don't let the technical names like "SM-DP+ Address" throw you off. Just think of it as the address for the server that holds your eSIM profile. Your iPhone uses that address and the activation code to securely find and download your plan.
Once you’ve entered the details, tap "Next," and your iPhone will start downloading the eSIM profile, just like it would with a QR code. From there, you'll be prompted to label your new plan and choose its settings for data and calls. You can get more details on device-specific settings in our complete guide to eSIM support for Apple devices.
The move to digital connectivity is happening fast. By 2026, eSIM adoption is projected to hit 1.5 billion devices worldwide, and with eSIM shipments for consumer devices expected to top 403 million in 2025 alone, mastering these simple installation tricks puts you ahead of the curve.
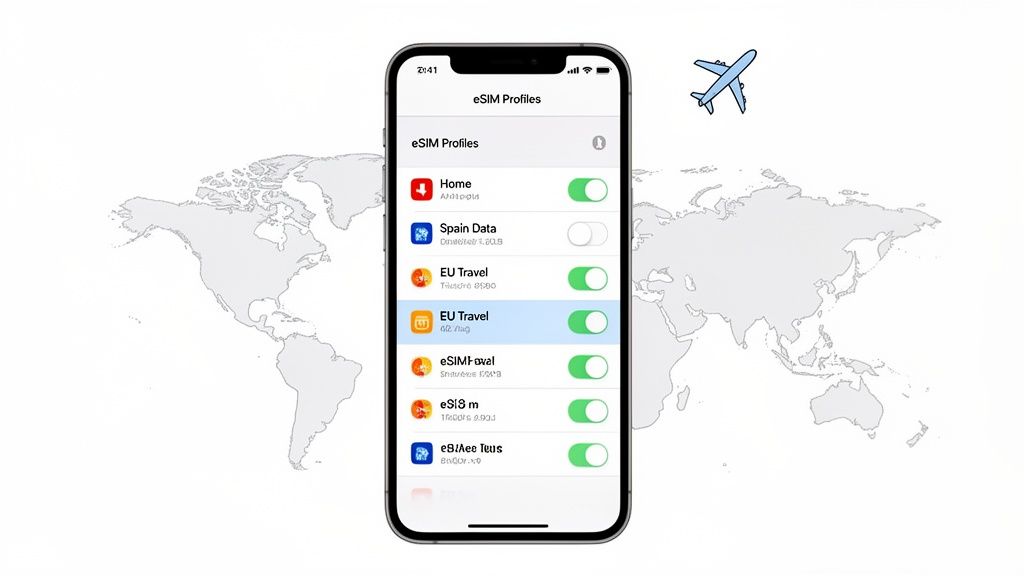
Managing Multiple eSIMs for Global Travel
One of the best things about modern iPhones is the ability to store multiple eSIMs at once. If you’re a frequent flyer or just bouncing between countries, this feature turns your phone into a true global travel companion. Newer models can hold eight or more eSIMs, letting you flip between plans with just a few taps.
This is a complete game-changer. Picture this: you’re heading out on a multi-country European trip. Instead of hunting down a new physical SIM card in every city, you can buy and install a single regional eSIM that covers the whole continent before you even pack your bags. The second you land, just turn it on, and you’re connected.
It’s no surprise that travelers are driving this massive shift to eSIMs. Smartphone eSIM penetration is expected to hit 23% globally in 2024, with a huge 41% for new devices sold in the U.S. alone. Travel is the main reason—people are discovering they can buy a plan once and just reactivate it for future trips, making it an incredibly convenient piece of tech.
Organizing Your Digital SIMs
To get the most out of your eSIMs, you need to keep them organized. Your iPhone’s Cellular settings are your command center for this, letting you label, activate, and deactivate each line.
My biggest piece of advice? Always give your plans descriptive names. Don’t just leave them as the generic carrier label. It will save you a headache later.
- "Europe Data" for your regional travel plan.
- "US Business" for your work number.
- "Home Primary" for your main line.
This simple habit makes it crystal clear which line is active and what it’s for, helping you avoid accidentally using the wrong one and racking up roaming fees.
Assigning Roles to Each Line
With multiple lines ready to go, you can create a completely custom setup that fits your travel style perfectly. Your iPhone lets you assign specific roles to each plan, giving you total control over how you stay connected.
Here’s a pro tip I always use: set your travel eSIM for mobile data only. In your Cellular settings, keep your home number as the default for calls and texts, but switch your Cellular Data default to the travel eSIM. This setup is the best of both worlds—you can still receive calls and SMS on your regular number, but all your apps use the cheap, local data plan.
This dual-SIM strategy is the smartest way to stay connected abroad without coming home to a shocking bill. For travelers who want even more privacy on their journeys, using temporary phone numbers can be a great addition to this setup.
Switching Between eSIMs on the Go
Flipping between your stored eSIMs is incredibly easy. When you arrive in a new country and you’ve already got a plan for it, here’s all you do:
- Head over to Settings > Cellular.
- Tap the eSIM plan you need for your current location.
- Just toggle "Turn On This Line" to activate it.
- Make sure any other travel eSIMs are turned off to save a little battery and avoid any network confusion.
Once you get the hang of these simple management tricks, your iPhone becomes an indispensable tool for global travel, ensuring you always have an affordable connection waiting for you.
Troubleshooting Common eSIM Installation Issues
Even with a pretty straightforward process, you can still hit a few snags when installing an eSIM on your iPhone. It happens. Technology has its quirks, and a small hiccup feels massive when all you want to do is get online. Think of this as your go-to guide for squashing the most common issues and getting your travel plan running without the drama.
Most of the time, the problem comes down to one of a few simple oversights. From a locked phone to a weak Wi-Fi signal, we’ll walk through the fixes that solve almost every installation headache I’ve ever seen.
Why Won't My QR Code Scan?
This one is a classic. You’re pointing your iPhone’s camera at the QR code, trying every angle, and… nothing. It’s a frustrating moment, but the solution is usually pretty simple.
First, check the basics. Is the QR code on your screen blurry or low-res? Try zooming in a bit or pulling it up on a better display. Good lighting also makes a huge difference, as your camera needs to see the code clearly.
And remember, you have to start the scan from the right place in your iPhone's settings.
- Head to Settings > Cellular > Add eSIM.
- Tap Use QR Code.
- Don't just open the main Camera app—that won't trigger the eSIM installation.
If it still won’t scan, the code itself might be the problem. This is where the manual installation method saves the day. Your provider should have sent the SM-DP+ Address and Activation Code in the same email as the QR code for exactly this reason.
The "Cellular Plan Cannot Be Added" Error
Getting an error like "Cellular Plan Cannot Be Added" or "This code is no longer valid" is your iPhone’s way of saying something is blocking the activation. Nine times out of ten, this points to one of two things: your iPhone is locked to your home carrier, or that eSIM has already been installed.
An iPhone must be carrier-unlocked to use eSIMs from other providers. You can check this by going to Settings > General > About and scrolling down to Carrier Lock. If it says anything other than "No SIM restrictions," you’ll need to contact your home carrier to get it unlocked before you can add a travel eSIM.
The other culprit is a used QR code. These codes are designed for a single use. If you’ve tried to install it before, even if the process failed partway through, the carrier’s server might have already marked it as used.
Here’s a critical rule of thumb for eSIMs: never delete the profile from your phone unless you are completely done with the plan for good. Deleting an eSIM is permanent, and you can't just reinstall it with the same QR code. If you've accidentally removed it, you’ll have to contact your provider and ask for a new one.
My eSIM Is Active, But I Have No Internet
This is easily the most confusing problem. You did everything right. The eSIM is installed, it shows up in your Cellular settings, and you even see signal bars. But when you try to open a website or use an app, you get nothing.
The fix for this is almost always buried in your settings.
- Turn on Data Roaming: Go to Settings > Cellular, tap your new travel eSIM, and make sure the Data Roaming toggle is switched on. This feels wrong, I know, but for a travel eSIM, it's essential. The plan works by "roaming" on a local partner network, so this setting has to be enabled.
- Check Your APN Settings: In some rare cases, you might need to manually configure the Access Point Name (APN). If this is necessary, your eSIM provider will include the details in their instructions. You can find the APN field under Settings > Cellular > [Your eSIM Plan] > Cellular Data Network.
- Select the Right Network: Sometimes, your iPhone doesn't automatically connect to the correct local network. You can give it a nudge by going to Settings > Cellular > [Your eSIM Plan] > Network Selection and turning off the "Automatic" toggle. Your phone will scan for available networks; just pick the one your eSIM provider told you to use.
By working through these steps one by one, you can solve just about any issue you run into. The key is to stay calm, check the simple things first, and know that a stable internet connection is usually just a few taps away.
Your iPhone eSIM Questions Answered
Jumping into the world of eSIMs can feel a bit like learning a new language. You know it’s the future, but a few questions always pop up, especially when you’re prepping for a big trip. Getting the details sorted out before you leave is the key to a smooth, stress-free arrival.
This section tackles the most common questions travelers ask about getting an eSIM up and running on an iPhone. We’ll cover everything from whether your phone is even compatible to what happens with your old SIM card, so you can manage your connection like a pro.
Can I Install An eSIM On A Locked iPhone?
This is a big one, and the answer is a hard no. Your iPhone absolutely must be carrier-unlocked to install and use an eSIM from a different provider, like the travel eSIMs we talk about here. A locked phone is tethered to the carrier you bought it from, and it simply won’t accept a plan from anyone else.
If you try to install an eSIM on a locked device, you’ll almost certainly run into the dreaded "Cellular Plan Cannot Be Added" error. It’s one of the top reasons for installation failure, so checking your phone’s status before you buy a plan is critical.
It's easy to check this yourself:
- Head to Settings > General > About.
- Scroll down to the Carrier Lock section.
- If it says "No SIM restrictions," you’re all set.
If you find out your iPhone is locked, you’ll have to contact your home carrier and ask them to unlock it. This process can sometimes take a few days, so make sure you handle it well in advance of your flight.
What Happens To My Physical SIM Card?
Absolutely nothing. Your physical SIM card stays right where it is, and you can keep using it. iPhones are built with Dual SIM technology, which means they can handle both a physical SIM and one (or more) eSIMs at the same time. This feature is a game-changer for travelers.
You can leave your primary SIM in the phone to get calls and texts on your regular number. At the same time, your new travel eSIM can be set to handle all your mobile data. This is the secret to dodging those outrageous roaming fees from your home carrier.
A setup I use on every trip is designating my home SIM for calls/texts and my travel eSIM for data. You can easily label each plan in your iPhone's Cellular settings and assign its role. It gives you total control over how you stay connected abroad.
This dual functionality means you don’t have to pick between being reachable on your main number and getting affordable local data. You get both.
Can I Reuse My Travel eSIM On Another Trip?
This really depends on the specific eSIM plan you buy. The vast majority of prepaid travel eSIMs—the kind you buy for a specific country and duration—are designed for single use. Once the data runs out or the validity period ends, the plan is deactivated and can’t be topped up or used again.
But this isn't a hard and fast rule. Some eSIM providers are starting to offer more flexible options:
- Top-Up Plans: Certain plans let you add more data or extend the validity, which is great for longer stays or if you plan on returning to the same region soon.
- Regional or Global Plans: Providers like Airalo or Holafly offer plans that cover entire continents. While they might still be single-use, they’re incredibly convenient for country-hopping.
Always read the fine print before purchasing. The product description will tell you clearly if an eSIM is a one-time deal or if it can be reloaded. For most people taking a typical vacation, buying a fresh eSIM for each trip is the standard—and most cost-effective—way to go.
Do I Need WiFi To Install An eSIM?
Yes, a stable internet connection is non-negotiable for the installation process. When you scan that QR code or punch in the details manually, your iPhone has to connect to the provider’s servers to download and activate the eSIM profile. Without internet access, that download just won’t happen.
Because of this, I always recommend using a reliable Wi-Fi network. While you could technically use mobile data from another active SIM, it can be spotty and might even cost you, depending on your plan.
Here’s a real-world tip that has saved me more than once: install your travel eSIM at home the day before you fly. This lets you get everything set up with your own fast Wi-Fi, no stress involved. The moment your plane lands, all you have to do is switch on the eSIM in your settings, and you're instantly connected. It beats fumbling with spotty airport Wi-Fi after a long flight every single time.
Ready to find the perfect plan for your next adventure? eSimGuide.com compares eSIMs from over 22 providers across more than 233 destinations, helping you find the best deal in minutes. Stop overpaying for roaming and start traveling smarter. https://esimgide.com


