How to Get a Sim Card: Quick Guide for Travelers
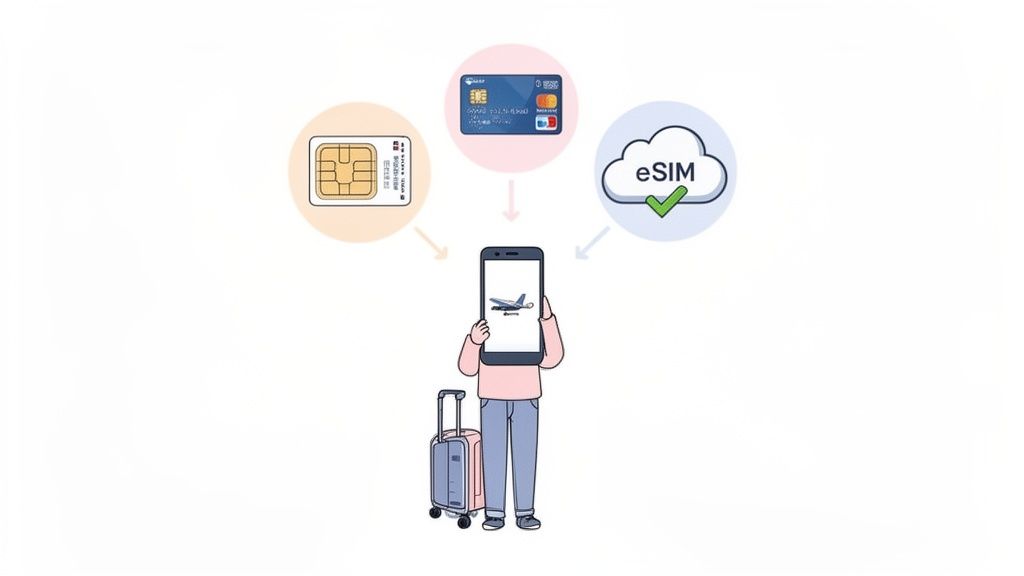
Figuring out how to stay connected on the road used to be a universal headache, but it really just boils down to a few core choices. You can grab a physical SIM card before you leave, buy one when you land, or go digital with an eSIM. Each has its place, and the right one for you really depends on your travel style.
Your Guide to Staying Connected While Traveling
Let's be honest, nobody wants to come home to a massive roaming bill. The whole game is about balancing convenience and cost, and just knowing your options is half the battle.
This guide will walk you through the real-world pros and cons of each method. We’ll cover why so many experienced travelers are switching to digital eSIMs for their insane flexibility, but we’ll also give you the practical know-how to confidently snag a local SIM card like a pro.
Breaking Down Your Connectivity Choices
What works best for you will come down to your destination, how long you’re staying, and how comfortable you are with a bit of tech. Buying a SIM in advance from an online shop gives you that amazing peace of mind, letting you hit the ground running with data the second you land. On the flip side, waiting to buy one from a local shop after you arrive often means better rates and bigger data packages—if you don't mind a small adventure navigating a new city to find one.
Some travelers even look beyond their phones for staying in touch. It's worth knowing the ins and outs of using tablets for phone calls while traveling, as the cellular service considerations are pretty similar.
Key Takeaway: There’s no single "best" way to get a SIM card. It’s all about matching the solution to the trip. For a multi-country European tour, a regional eSIM is a no-brainer. But for a month-long deep dive into Thailand, a local physical SIM will almost always be cheaper.
To make this even clearer, here's a quick rundown of your main options.
Your Travel Connectivity Options at a Glance
| Connectivity Option | Best For | Convenience Level | Typical Cost |
|---|---|---|---|
| Buy a SIM at Home | Planners who want immediate connectivity on arrival. | Medium | $$ - $$$ |
| Buy a SIM at the Airport | Last-minute travelers who prioritize convenience over cost. | High | $$$ |
| Buy a SIM from a Local Shop | Budget-conscious travelers on longer trips (1 week+). | Low | $ |
| Activate an eSIM | Tech-savvy travelers, short trips, and multi-country hops. | Very High | $$ |
As you can see, the airport option is always the easiest but also the priciest. A little bit of planning, whether it’s ordering an eSIM from your couch or finding a local shop, can save you a surprising amount of cash.
Why Planning Ahead Matters
The rise of eSIMs has totally changed the game for a lot of us. These digital-only SIMs have one massive advantage: you can research, buy, and install your data plan from home before your trip even starts. This completely eliminates that frantic, post-flight scramble to find a SIM kiosk at the airport, where the prices are always jacked up.
Think about the immediate benefits of having your connectivity sorted out beforehand:
- Instant Connection: You can activate your plan the moment the plane lands. Go ahead and order a rideshare, check Google Maps, or let your family know you’ve arrived without begging for spotty airport Wi-Fi.
- Cost Control: Shopping for plans online lets you compare providers and find the best value, sidestepping the "convenience tax" you’ll pay at any airport terminal.
- Better Security: Buying from a trusted online provider means you're not handing your passport over to a random kiosk vendor in a foreign country.
In the end, whether you go with a physical card or a digital eSIM, a little bit of foresight makes all the difference.
Physical SIM vs Digital eSIM for Travelers
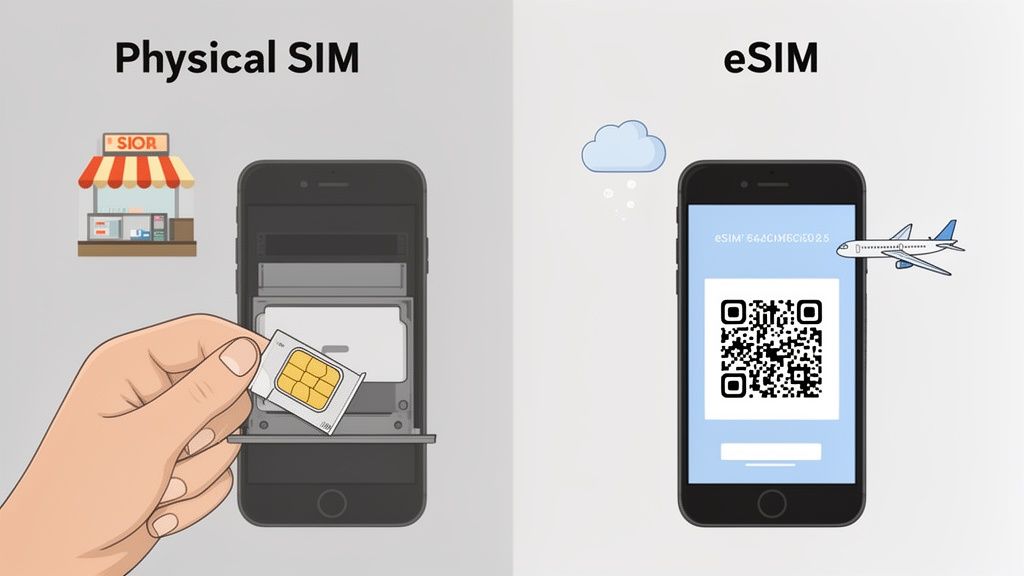
Every traveler eventually faces this choice: stick with the old-school plastic SIM card or go digital with an eSIM? This isn't just a tech question—it completely changes how you connect abroad.
The physical SIM is what we all know. You buy it, you pop it into your phone, and it works. But that simple process often involves hunting down a kiosk in a chaotic airport, fumbling with that tiny piece of plastic, and hoping you don't lose your original SIM in the process. It's familiar, but it can be a real hassle after a long flight.
Then there's the eSIM, which ditches the plastic entirely. You can buy and install a plan from your couch before you even leave home. Activation is as simple as scanning a QR code, and you’re online the second the plane's wheels touch the tarmac. It turns that stressful first hour of arrival into a non-event.
The Real-World Scenarios
Let's put this into perspective with two common traveler types.
First, imagine a backpacker zigzagging through Southeast Asia. For them, swapping physical SIM cards in every new country is a logistical headache. A regional eSIM that covers multiple countries is a total game-changer, letting them cross borders without ever losing connectivity.
Now, think of a business traveler on a quick trip to London. They need to be online immediately upon landing to grab a ride and check in with the office. An eSIM, purchased and installed before departure, gives them that instant connection, saving valuable time and stress.
Traveler's Tip: Here's the easiest way to think about it. Getting a physical SIM is like having to find a ticket machine to buy a metro pass after you arrive. An eSIM is like having that pass already loaded on your phone before you even walk out the door.
This shift to digital is a huge step forward in mobile tech. If you want to get into the nitty-gritty, our guide explaining what an eSIM is and how it works has you covered.
And it's not a niche trend. The E-SIM market is projected to jump from USD 494.1 million in 2020 to USD 1,986.3 million by 2026. That kind of growth shows just how many travelers are ditching the plastic. You can find more details on this expanding market over at Stratview Research.
Comparing Your Options Side-by-Side
To really see the difference, let’s break down what matters most to a traveler. This is about more than just data—it’s about convenience.
| Feature | Physical SIM Card | Digital eSIM |
|---|---|---|
| Purchase Process | Requires visiting a physical store (airport, local shop). | Can be purchased and installed online anytime, anywhere. |
| Activation | Manual insertion of the card; may require in-person registration. | Digital activation via QR code or app, often instant. |
| Security | Can be lost or stolen, requiring a physical replacement. | Cannot be physically lost; secured within your device. |
| Multi-Country Travel | Need to buy and swap a new SIM for each country. | Can store multiple regional or global plans on one phone. |
| Device Compatibility | Works with nearly all phones, including older models. | Supported by most newer flagship smartphones. |
Long-Term Advantages for Frequent Flyers
If you travel a lot, the benefits of eSIMs really start to add up. You can store multiple eSIM profiles on one phone—one for Europe, one for Asia, and another for the US—and just switch them on as needed.
This completely removes the "find a SIM card shop" task from your arrival checklist. Better yet, you can keep your primary number active for important calls and texts while using the eSIM for cheap local data. It’s the best of both worlds.
Where to Get Your Travel SIM Card
Knowing where to grab your travel SIM is just as important as deciding which kind to get. The spot you choose can make a huge difference in cost, convenience, and how much of a headache it is to get online.
Let's break down the most common places travelers go and what each one really means for your trip. Every option has its trade-offs, from the speed of an airport kiosk to the value you'll find in a local shop in the city. Getting this right from the start is key.
The Airport Arrival Kiosk
You know the scene: you land after a long flight, and the first thing you see are brightly lit kiosks from all the major carriers. This is, without a doubt, the easiest option. You can be online before your luggage even hits the carousel.
But that convenience comes at a price. Airport kiosks are famous for their inflated "tourist tax," meaning you'll almost always pay more for less data. They're a fantastic safety net if you absolutely need a connection right away, but you're paying a premium for the location.
A Local Carrier Store in the City
For the best deals and a much wider selection of plans, your best bet is to head to an official store for a local carrier, like Orange in France or AIS in Thailand. The staff there are experts and can help you pick a plan that actually fits your trip length and data habits.
The only real downside is the logistics. You’ll have to find a store in a new city, maybe deal with a language barrier, and potentially wait in line. You will also definitely need your passport for registration. For any trip longer than a week, the savings usually make this small initial effort totally worth it.
Pro Tip: Always have your passport with you when buying a physical SIM card abroad. Most countries have mandatory registration laws, and they won't sell you one without it. This goes for both airport kiosks and local shops.
Convenience Stores and Supermarkets
In many parts of the world, especially across Asia and Europe, you can just pop into a 7-Eleven or a local supermarket to buy a prepaid SIM card. It's quick, it's easy, but there's a catch.
The person behind the counter can sell you the card, but they probably can't help you activate it, set it up, or troubleshoot if things go wrong. This option works best for travelers who are comfortable getting a new SIM working on their own.
The Rise of Online eSIM Marketplaces
This is where the game has completely changed for modern travel. Online eSIM marketplaces let you browse, compare, and buy a data plan from your couch before you even start packing. This approach gives you the best of both worlds—convenience and value—while skipping the hassles of physical stores.
The international travel SIM market has exploded, valued at USD 3.84 billion in 2026 and projected to hit USD 5.44 billion by 2032. You can dig into the numbers in this detailed industry report.
Here’s why so many travelers are going digital:
- No More Waiting: You install the plan at home with a QR code and flip it on the moment you land. No lines, no language barriers, no stress.
- See Everything Upfront: These marketplaces let you compare dozens of plans side-by-side, read real user reviews, and see exactly what you're paying with no hidden fees.
- Cover Whole Regions: Instead of buying a new SIM every time you cross a border, you can grab one eSIM that covers all of Europe or Southeast Asia.
Platforms like these have made getting connected abroad incredibly simple. To see which providers offer the best deals for your next trip, check out our regularly updated guide on the best eSIMs for international travel. It’s the easiest way to make sure you’re online from the second your adventure begins.
Getting Your New Travel SIM or eSIM Working
You've got the SIM, now for the final hurdle: making it work. Whether you're holding a tiny piece of plastic or staring at a QR code in your email, getting connected is usually a quick affair. Don't let the technical bits and pieces scare you off; it's almost always a simple process.
For a physical SIM, it’s a hands-on job. First, you need to locate the SIM tray on your phone—it’s that little slot on the side. You’ll need a SIM ejector tool (the little metal pin that came in your phone's box) or, my personal favorite travel hack, an unfolded paperclip. Just poke it in the hole to pop the tray open.
Slide the new SIM into the tray, making sure it fits the cutout shape. Push it back in, and your phone should recognize the new network in a minute or two.
This flowchart shows the three main paths travelers take to get their hands on a SIM, each with its own balance of cost and convenience.
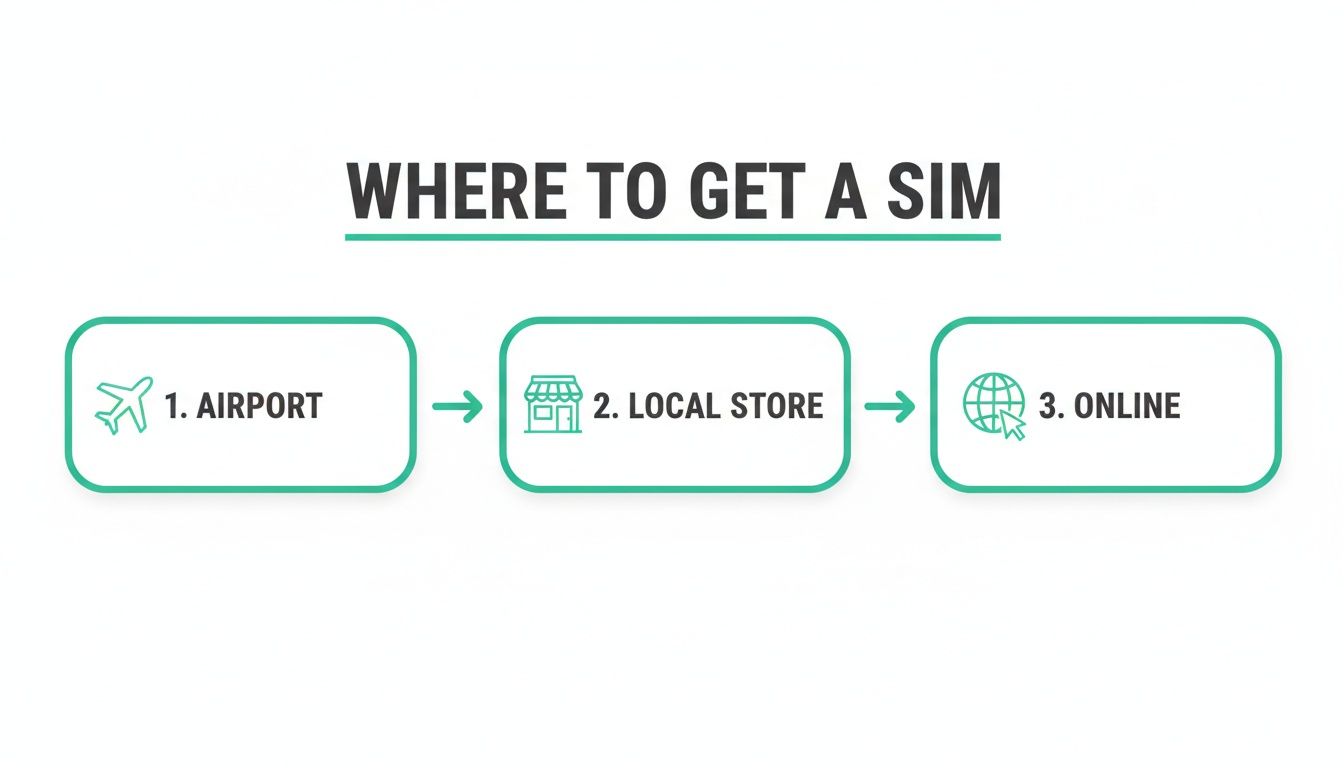
As you can see, buying at the airport is fast but pricey, local shops offer better deals with a bit more effort, and online eSIMs skip the physical hassle entirely.
Activating a Digital eSIM
The eSIM process is pure digital magic. No plastic, no paperclips. You'll get an email from your provider with a QR code, and that's pretty much all you need. Just make sure you're connected to Wi-Fi to get started.
Here’s the typical drill for most modern phones:
- Find Your Cellular Settings: On an iPhone, head to
Settings > Cellular > Add eSIM. For Android users, it’s usually something likeSettings > Network & Internet > SIMs. - Scan the QR Code: Your phone will open its camera. Point it at the QR code in your email.
- Follow the Prompts: Your phone will walk you through the last few steps, like confirming the plan details.
Traveler’s Tip: Always, always label your new eSIM. Call it "Spain Trip" or "Thailand Data." This makes it dead simple to switch between your home and travel plans without accidentally racking up roaming charges. Trust me on this one.
Once it's installed, you have one last critical step. Go back into your cellular settings and switch Mobile Data to your new eSIM. This tells your phone to use the cheap travel data for the internet, while you can still keep your home number active for calls or texts if you need to.
When Things Don't Work Right Away
It happens. You pop in the SIM, and… nothing. Before you start to panic, try a few quick fixes.
First, just restart your phone. It sounds too simple to work, but this forces your device to search for networks again and fixes the problem more often than you'd think.
If that doesn't do the trick, the culprit is probably your phone's APN (Access Point Name) settings. Think of the APN as the specific address your phone needs to connect to the carrier's mobile data network. Most phones set this up automatically, but sometimes it needs a manual nudge.
Your SIM provider will have the correct APN details in their instructions. Here's where to put them:
- On iPhone: Go to
Settings > Cellular > Cellular Data Network. - On Android: The path can vary, but look for something like
Settings > Network & Internet > Mobile Network > Advanced > Access Point Names.
You’ll just need to copy and paste the info they give you—usually an APN name and maybe a username and password. It’s a five-minute fix that can turn a frustrating "No Service" message into a full-strength data connection, getting your trip right back on track.
Smart Tips for Using Your Travel SIM
Once your travel SIM is up and running, the real goal is to stay connected without any nasty surprises on your bill. Over the years, seasoned travelers pick up a few tricks to get the most out of their data plans, sidestep hidden fees, and fix common glitches before they can ruin a day.
It all starts with being honest about how much data you actually need.
Are you a light user who just needs maps and messaging? Or are you a data fiend who'll be streaming Netflix and uploading high-res photos to the cloud? A light user can easily get by on 1-2 GB per week. A heavy user, on the other hand, could burn through that in a single afternoon.
The most common mistake is overbuying. My advice? Start with a smaller plan from a provider that offers easy online top-ups. It’s far better to add another gigabyte with a few taps in an app than to pay for 10 GB you never even touch.
Avoiding Hidden Costs and Policy Traps
Before you hit that "buy" button, take a minute to scan the fine print. You're looking for one thing in particular: the Fair Usage Policy (FUP).
This is where "unlimited" plans often reveal their true colors. Many will give you a set amount of high-speed data—say, 2 GB per day—and then throttle your connection to speeds so slow they feel like dial-up.
This is a deal-breaker if you need to use your phone's hotspot for work. That super-slow connection will make video calls completely impossible. While you're at it, double-check that the plan allows tethering at all; some of the rock-bottom budget options block it entirely.
Key Insight: The best deal isn't always the lowest price per gigabyte. I'd much rather pay a little more for a plan with a transparent data policy and simple top-ups than get stuck with a cheap "unlimited" plan that has a hidden speed cap.
This demand for reliable, no-nonsense connectivity is why the global SIM card market is still a behemoth. Even with public Wi-Fi everywhere, nothing beats having your own dependable data. The traditional SIM card market alone was valued at a staggering US$3,694 million back in 2025, which shows just how many of us still rely on these little chips. You can see the full scope of the SIM card market to get a sense of the scale.
Your Pre-Travel Troubleshooting Checklist
The absolute best time to sort out any potential tech issues is before you leave home, while you're still on your fast, reliable Wi-Fi. This goes double for eSIMs.
- Install Your eSIM at Home: Always, always install your eSIM profile before your trip. The process requires a stable internet connection to download the plan, and trying to do this on spotty airport Wi-Fi is a recipe for pure frustration.
- Screenshot the QR Code: Save a picture of your eSIM's QR code to your phone's photo gallery. Even better, save it on a separate device like a tablet. If you accidentally delete the email, you'll still have the code you need.
- Know Your APN Settings: Your provider will send you APN (Access Point Name) details. Jot them down in a notes app or take a screenshot. If your data doesn't kick in when you land, manually entering these settings is the most common fix.
On-the-Go Fixes for Common Glitches
Even with perfect preparation, sometimes things just don't work. If you land and your phone stubbornly shows "No Service," don't panic.
First, try the oldest trick in the IT book: turn your phone off and on again. A simple restart forces the device to re-scan for local networks and, believe it or not, solves the problem more than half the time.
No luck? Toggle Airplane Mode on for about 30 seconds, then switch it off. This also nudges your phone to re-establish its connection.
If you're still offline, it's time to pull out those APN settings you saved and enter them manually. And one last thing—make sure data roaming is switched on in your phone's settings for your travel SIM. It sounds counterintuitive, but most international plans require it to connect to partner networks. Of course, if you're trying to dodge charges from your home carrier, our guide on how to avoid roaming charges has you covered.
Common Questions About Travel SIMs
Even after you've picked a plan, a few questions always seem to pop up. The world of international SIMs can feel a bit tangled at first, but a couple of clear answers can make all the difference. I've pulled together the most common things travelers ask to help you get connected without any guesswork.
Sorting out these small details before you fly is the best way to avoid that "just landed" stress. Let's clear up the confusion, from keeping your home number working to making sure your phone is even ready for a travel SIM.
Can I Keep My Regular Phone Number Active?
Yes, absolutely. This is one of the biggest wins of using a phone with dual-SIM or eSIM capabilities. You can keep two lines active at once.
This lets you set your new travel eSIM as your primary for all mobile data, dodging those outrageous roaming fees from your home carrier. At the same time, your home SIM can stay active just for incoming calls and texts. It's the perfect setup for getting those crucial two-factor authentication (2FA) codes for banking or hearing from family, all without paying for an expensive international data plan back home. You just toggle a few settings on your phone to assign data to one line and voice/text to the other.
Here's how it plays out in the real world: You're in Italy and need to approve an online purchase. Your bank sends a verification code via SMS to your US number. With your home line still active for texts, that code pops up instantly, while your phone keeps using the cheap Italian eSIM for Google Maps and everything else. It just works.
What if My Phone Is Locked to a Carrier?
This is the single most important thing to check before you buy any travel SIM. If your phone is locked, it's basically hardwired to only work with SIM cards from the carrier you bought it from. A foreign SIM or eSIM simply will not work. End of story.
The good news? It's easy to find out. The most direct way is to just call your home carrier and ask. If you've paid off your phone and finished your contract, they are often legally required to unlock it for you, free of charge. Don't skip this—confirming your phone is unlocked is the first critical move.
How Do I Know if My Phone Supports eSIM?
Checking for eSIM compatibility is a quick, 30-second task you can do right on your phone. Most flagship smartphones from Apple, Google, and Samsung released in the last few years have it, but it’s always smart to be certain.
Here’s how to quickly confirm:
- On an iPhone: Go to
Settings > Cellular. If you see an option that says "Add eSIM" or "Add Cellular Plan," your phone is compatible. - On an Android: The path is usually
Settings > Network & Internet > SIMs. Look for a plus sign or an option to add a network via QR code.
If you see those options, your device is ready for a digital SIM. You can get online without ever having to track down a tiny piece of plastic.
What Happens if I Run Out of Data?
This completely depends on the provider you choose, which is why it's a great question to ask before you buy. Some of the rock-bottom budget plans will just cut you off cold once you hit your limit, leaving you scrambling for Wi-Fi.
Others will "throttle" your connection, slowing your speeds down so much that it's practically useless. The best providers, however, make it incredibly simple to top up. You can usually buy more data right from their app or website with just a few taps. We always recommend picking a provider that offers easy, on-the-go top-ups so you're never left disconnected when you need it most.
Ready to find the perfect eSIM for your next adventure? At eSimGuide.com, we compare plans from over 22 providers across the globe, so you can connect the moment you land. Find your ideal travel data plan today at https://esimguide.com.