What is an esim and how does it work: A Quick Guide for Travelers
An eSIM, short for embedded SIM, is a tiny, programmable chip that's already built right into your phone. It lets you activate a cellular plan without ever needing a physical SIM card.
So how does it work? You simply download a carrier's profile—which is basically a digital SIM card—straight to your device. This usually happens by scanning a QR code or tapping a button in an app. The whole process makes switching networks or getting data while traveling ridiculously simple and fast.
What Is an eSIM and How Does It Work for Travelers
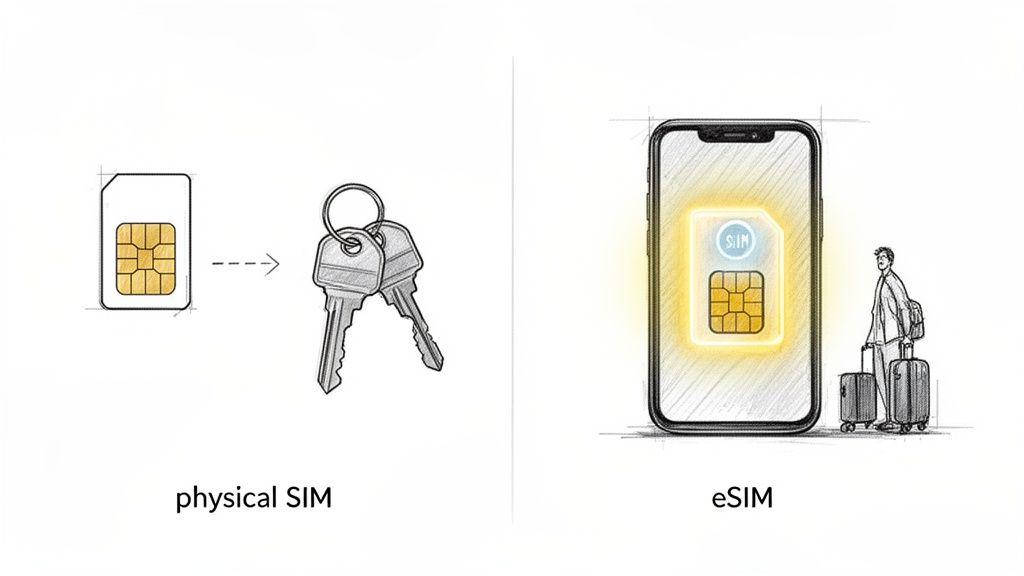
Think about ditching that tiny, easy-to-lose plastic SIM card for good. That’s the simple promise of an eSIM. Instead of wrestling with ejector tools and swapping little chips at an airport kiosk, you just get connected digitally. For anyone who travels, this technology is an absolute game-changer.
Here's a good way to think about it: a physical SIM card is like a house key you have to carry around and swap for a different one every time you go to a new place. An eSIM, on the other hand, is like a secure digital keycard stored on your phone. You can download and keep multiple "keycards" (data plans) at once, switching between them with just a few taps in your phone's settings.
The Traveler’s Advantage
For international travelers, this means you can have data the second your plane touches down. You can buy a local data plan from a provider like eSimGuide.com before you even pack your bags. This one simple step lets you sidestep those notoriously expensive roaming fees that can eat up a huge chunk of your travel budget.
Industry reports suggest that avoiding roaming can save you 20-30% on your connectivity costs during a trip. That's a serious saving, whether you're a frequent flyer or just taking a family vacation. You can read more about the global growth of eSIMs on Juniper Research and see how travelers are driving the trend. This move to digital activation just offers so much more convenience and value.
The real magic for travelers is the flexibility. An eSIM allows you to keep your primary phone number active for calls and texts while using an affordable, local data plan for everything else—from navigating with Google Maps to sharing photos.
eSIM vs Physical SIM A Traveler's Comparison
To really see the difference, let's put the two formats side-by-side from a traveler's perspective. It helps clarify why so many people are making the switch.
This table breaks down the essential differences between modern eSIM technology and traditional physical SIM cards when you're on the road.
| Feature | eSIM (Embedded SIM) | Physical SIM Card |
|---|---|---|
| Activation | Instant digital activation via QR code or app. | Requires physical purchase and manual insertion. |
| Plan Management | Store and switch between multiple plans digitally. | One plan per card; requires swapping to change. |
| Flexibility | Purchase and install plans from anywhere with Wi-Fi. | Requires finding a physical store or airport kiosk. |
| Security | Cannot be physically lost, stolen, or damaged. | Can be easily lost, damaged, or stolen. |
Ultimately, the choice often boils down to convenience versus tradition. As you can see, the eSIM offers a clear advantage in almost every scenario a traveler might face.
How an eSIM Connects Your Phone to a New Country
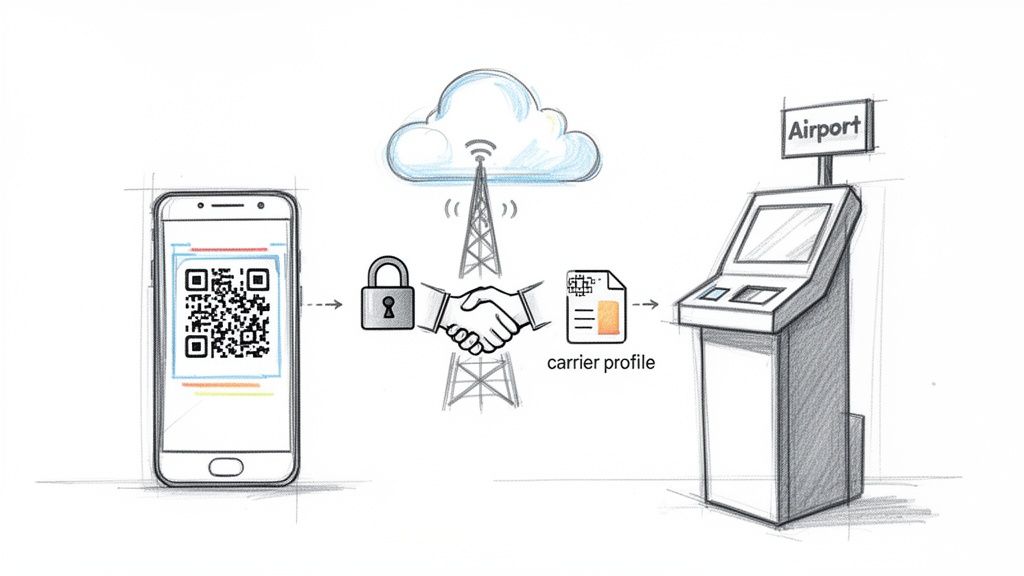
The real magic of an eSIM is how it gets your phone connected in a new country, often before you’ve even stepped off the plane. The process is a lot like downloading a new app that instantly gives your phone a special 'local passport' for mobile data. It all starts with a simple scan or tap.
When you buy a travel eSIM, you’ll usually get a QR code. Scanning this with your phone’s camera kicks off a secure, digital handshake between your device and the new mobile carrier. It all happens instantly and securely in the background.
This handshake tells your phone to download a small but critical file called a carrier profile. Think of this profile as a set of digital instructions that tells your phone exactly how to talk to the local cell towers in your destination.
The Digital SIM Card Installation
Once downloaded, this carrier profile installs itself directly onto your phone’s embedded SIM chip. It’s packed with all the essential network info—like access point names (APNs) and authentication details—that allows your phone to be recognized and welcomed by the foreign network.
The entire process is known as over-the-air (OTA) provisioning. It’s just a technical way of saying your network access is delivered remotely over Wi-Fi or your existing data connection, without you ever having to physically touch a SIM card or visit a store. This is what makes eSIMs so ridiculously convenient for travelers.
The core function of an eSIM is its ability to be remotely programmed. Instead of a physical chip manufactured for one specific carrier, the embedded chip in your phone is a blank slate, ready to securely download and run the software of whichever carrier you choose.
This is a massive leap from old-school SIM cards, which are hard-coded with one carrier's information. With an eSIM, you're in the driver's seat, loading the plans you need, exactly when you need them.
Managing Multiple Travel Plans
One of the most powerful features of eSIM technology is the ability to store multiple carrier profiles on one device. It’s how you can seamlessly switch from your home plan to a local one without fumbling with tiny plastic cards. Modern phones can store 8 or more eSIM profiles on the embedded chip, and you can activate them on the fly right from your phone’s settings.
This multi-profile capability is a game-changer for anyone visiting several countries. You could have eSIMs for Spain, Thailand, and the USA all loaded up and ready to go at the same time.
- Your Home Plan: You can keep your primary physical SIM or eSIM active for calls and texts from your regular number.
- Your Travel Data Plan: At the same time, you can use a travel eSIM for all your mobile data, dodging those nasty roaming fees.
Switching between them is as easy as flipping a switch in your phone’s cellular settings. You can even label each plan (like "Home Number" or "Europe Data") to keep things organized and pick which one to use for data at any moment. Of course, knowing how an eSIM connects is one thing, but it helps to see the bigger picture of how to get internet access while traveling abroad to make the best choice for your trip.
Checking if Your Device Is eSIM Ready
Before you can jump into the world of instant travel data, the first crucial step is to make sure your phone is on board. The great news? You don’t have to dig through confusing lists of model numbers online. You can find out if your phone supports eSIM in less than a minute, right from its settings menu.
Think of this simple check as your passport to unlocking all the benefits an eSIM offers on your next trip. It's a quick, decisive step that paves the way for a much smoother, more connected travel experience.
How to Check for eSIM on an iPhone
If you have an iPhone, Apple makes this check incredibly simple. You can verify your phone’s compatibility with just a few quick taps.
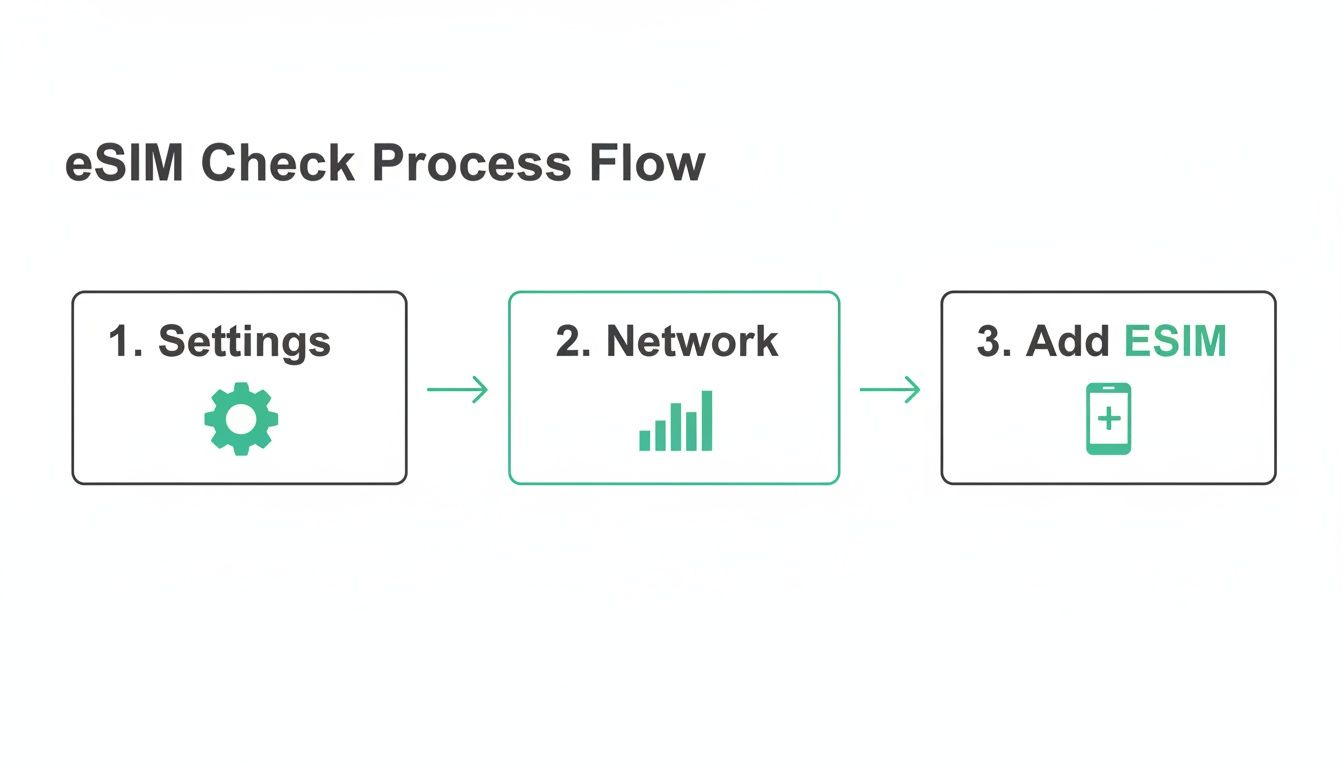
- Open the Settings app on your iPhone.
- Tap on Cellular (or Mobile Data in some regions).
- Look for an option that says Add eSIM or Add Cellular Plan.
If you see either of those options, your iPhone is 100% eSIM ready. That little button is your green light, confirming the embedded chip is there and waiting for you to install your first digital travel plan.
How to Check for eSIM on Android Devices
The process for Android phones is just as easy, though the exact words might change a bit depending on who made your phone (like Samsung, Google, or OnePlus). The core steps, however, are almost identical.
- Go to Settings on your Android device.
- Select Network & Internet or a similar option like Connections.
- Tap on SIMs or SIM Card Manager.
- Look for a "+" button or an option labeled Add eSIM.
Finding this option confirms your Android device is compatible. It means your phone has the hardware needed to download and manage digital SIM profiles, and you’re officially ready to leave physical SIM cards behind.
The industry's move toward eSIM technology has been swift. While support first started popping up in flagship phones around 2018, it’s now a standard feature in most modern smartphones, tablets, and even smartwatches.
This widespread adoption means staying connected abroad is easier than ever. The tech is no longer a niche feature for early adopters but a mainstream tool for any savvy traveler. For a more detailed breakdown, our guide on how to check if your phone supports eSIM offers extra tips and model-specific info.
The Rise of eSIM-Only Phones
The shift to eSIM technology isn't just a passing trend—it's the future. The clearest sign comes from the biggest players in the industry. For instance, recent iPhone models sold in the United States are now eSIM-only, meaning they don't even have a physical SIM card tray anymore.
This bold move really hammers home how reliable and secure eSIMs have become. It also makes checking your device's compatibility more important than ever, especially if you're buying a new phone. As more manufacturers follow this path, knowing how to manage an eSIM will become a basic skill for anyone traveling internationally. It's the new normal for seamless, global connectivity.
Activating Your First Travel eSIM Step by Step
Getting your first travel eSIM up and running is way easier than it sounds. The whole thing boils down to a simple three-step dance: buy your plan, install it on your phone, and then flip the switch when you land. Let's walk through it so you can hit the ground running with zero stress.
The beauty of this process is that it completely skips the old routine of hunting for a local SIM card shop, fumbling with language barriers, or wrestling with those tiny plastic chips.
Stage 1: Purchasing Your Plan
First things first, you need to pick the right data plan for your adventure. This is where using a comparison site like eSimGuide.com really pays off—you can filter all the options by where you're going, how much data you need, and how long you'll be there.
When you're browsing, keep these three things in mind:
- Destination Coverage: Are you staying in one country, or do you need a regional plan that works across several places, like a "Europe" or "Asia" package?
- Data Amount: Be honest about how much data you'll burn through. If you're just using maps and messaging, you won't need much. But if you plan on streaming video or using your phone as a hotspot, you'll want more gigabytes. A 5GB plan is usually a great starting point for a week-long trip.
- Plan Validity: Double-check that the plan's duration (like 7, 15, or 30 days) matches your travel dates.
Once you find the perfect plan and buy it, you’ll get an email with a QR code and instructions. That QR code is your golden ticket. Pro tip: take a screenshot of the QR code right away. Having it saved in your photos makes the next step a breeze.
This is the basic path you'll follow on pretty much any smartphone to add your new eSIM.
 Just remember this simple flow: pop into your Settings, find the Network or Cellular menu, and look for the option to Add eSIM. It’s the universal starting point for both iPhones and Androids.
Stage 2: Installing the eSIM Profile
Installation is just the fancy word for getting the digital SIM onto your phone. The number one rule here is to install your eSIM at home before you leave, while you have a solid Wi-Fi connection. Seriously, don't wait until you're at the airport or trying to find a signal at your destination.
The QR code method is the most common and by far the easiest:
- Head to your phone’s settings: On an iPhone, this is
Settings > Cellular > Add eSIM. On an Android, it’s usually something likeSettings > Network & Internet > SIMs, then tap the "+" or "Add eSIM" button. - Scan the QR code: Your phone will open its camera. Just point it at the QR code from your email (or that screenshot you saved).
- Follow the on-screen prompts: Your phone will recognize the plan and walk you through a couple of quick confirmation screens. It’s also a good idea to give your new eSIM a custom label, like "Spain Data," to keep things organized.
If the QR scan doesn't work for some reason, don't panic. Most providers give you a manual option where you can just copy and paste an activation code and address.
Crucial Tip: Just installing the eSIM does not start your plan's clock. The countdown on your plan's validity only begins when you activate it. Understanding this difference is key to getting every bit of data you paid for.
Stage 3: Activating Your Plan Upon Arrival
This is the final, most important step. Activation is when you officially turn your eSIM on, connect to a local network, and kick off your data plan. The absolute best practice is to wait until you have landed at your destination before you activate your eSIM.
If you activate it too early, like during a layover in a country your plan doesn't cover, you could start the clock ticking and waste a day of your plan.
Here’s how to do it right:
- Once you’ve landed, go back into your phone’s cellular settings.
- Tap on the travel eSIM you installed earlier.
- Toggle it on and make sure "Data Roaming" is also enabled for that specific eSIM.
Within a few moments, your phone should connect to a local network, and you'll be online. By following this simple purchase-install-activate sequence, you set yourself up for a seamless connection from the moment you arrive.
For more in-depth tutorials, you can find more information about the eSIM activation process and how to handle any specific snags.
The Pros and Cons of Using eSIMs for Travel
Like any travel gear, eSIMs aren't perfect. It's smart to understand both the good and the bad to figure out if they’re the right call for your trip. While they offer some incredible convenience, it pays to have a balanced view of what you're actually getting.
Let’s be honest, the advantages go way beyond just saving a few bucks on data. Picture this: you land after a 12-hour flight, and you’re online ordering a car before you even reach baggage claim. That’s the magic of an eSIM—it completely kills the stress of hunting for an airport SIM kiosk.
The Clear Advantages for Travelers
The real benefits of using an eSIM touch on convenience, cost, and security, making it a seriously compelling option for pretty much any trip abroad. It fundamentally changes how you handle staying connected, putting you back in control.
Here’s where they really shine:
- Instant Connectivity on Arrival: You can buy and set up your eSIM from your couch before you even leave home. The second your plane’s wheels touch the tarmac, you just flip it on and you're connected to a local network. No more Wi-Fi hunting.
- Serious Cost Savings: By tapping into a local or regional eSIM, you get to laugh in the face of those absurd international roaming fees your home carrier loves to charge. This can save you a ton of cash, especially on trips longer than a week.
- Better Security: A physical SIM card can be lost, swiped, or just plain damaged. An eSIM is baked right into your device, so you can't lose it. It also makes your phone a much less appealing target for thieves since they can't just pop out the SIM.
- Dual SIM Power: This is a game-changer. You can keep your primary number active for important calls or those two-factor authentication texts you need for banking, all while using the travel eSIM for cheap, fast data.
The market’s explosive growth tells the story. Once a niche tech for early adopters, the global travel eSIM market is on track to jump from USD 709.68 million to USD 1.85 billion by 2032. That’s not just a trend; it’s a massive shift driven by travelers who are tired of the old way of doing things. You can read up on these market trends and their impact on travelers to see just how fast things are moving.
Weighing the Pros and Cons of Travel eSIMs
To make the right call, it helps to see the highlights and the hurdles side-by-side. Here’s a quick breakdown of what you're getting into with a travel eSIM.
| Advantages (Pros) | Disadvantages (Cons) |
|---|---|
| Instant connection right after you land. | Device compatibility can be an issue with older or budget phones. |
| Major savings by avoiding your home carrier's roaming fees. | Transferring an eSIM to a new phone isn't as simple as swapping a physical card. |
| Enhanced security since the SIM can't be physically lost or stolen. | Limited availability in some very remote or less-traveled destinations. |
| Dual SIM capability lets you use your home number and a data plan at the same time. | Activation can require Wi-Fi, which needs to be done before you lose your connection. |
| Eco-friendly by eliminating plastic waste from physical SIM cards. | Troubleshooting can sometimes be more complex without a physical object to check. |
Ultimately, for most travelers, the convenience and cost savings far outweigh the minor drawbacks, which are becoming less of an issue every year.
Potential Drawbacks to Consider
Now, while the upside is huge, there are a few limitations to have on your radar before you dive in. These are mostly small hurdles, but it's always better to be prepared.
The biggest challenges with eSIMs right now aren't really about the technology itself. It’s more about its current stage of adoption. As more devices and providers get on board, these issues are fading away fast.
Here’s a transparent look at the cons:
- Device Compatibility: Most flagship phones made since 2018 have eSIM support, but not every device does. It's absolutely critical to check if your phone is compatible before you buy a plan, especially if you have an older model or a budget Android.
- Transferability Headaches: Moving an eSIM from one phone to a new one isn't as simple as popping out a tiny piece of plastic. The process is getting smoother, but it can still sometimes mean you have to contact the provider for help.
- Spotty Availability in Remote Areas: If your travels are taking you way off the beaten path, you might find that grabbing a local physical SIM is still easier than finding an eSIM provider. Always check coverage on a site like eSimGuide.com before you commit.
And remember, while an eSIM nails the mobile data part of your travel toolkit, a complete strategy for staying connected and secure abroad often includes tools like a VPN for privacy. Taking a balanced view ensures you're ready for every part of your digital life on the road.
Troubleshooting Common eSIM Issues on the Go
Even the slickest tech can have its moments, and eSIMs are no different. The good news is that most hiccups are incredibly easy to fix, usually in just a few seconds. This guide will walk you through the most common snags travelers hit, so you can get back online and enjoy your trip without the stress.
These simple fixes can turn a moment of panic into a minor, forgettable bump in the road. Most of the time, a quick settings check or a simple restart is all it takes.
Your QR Code Won't Scan
One of the most frequent hurdles is an uncooperative QR code. It's frustrating when your phone’s camera just won't seem to recognize it, but the solution is almost always straightforward.
Before you start to worry, run through this quick checklist:
- Clean Your Camera Lens: A simple fingerprint or smudge is the #1 reason for scanning failures. Give the lens a quick wipe with a soft cloth and try again.
- Check Screen Brightness: If you're scanning the code from another device's screen, crank the brightness all the way up and make sure there's no glare.
- Try Manual Input: Still no luck? Don't sweat it. Your provider almost always includes the manual installation details right in the same email. Just copy and paste the SM-DP+ Address and Activation Code into the manual setup screen on your phone.
An eSIM is just a set of digital instructions. Whether those instructions come from a QR code or you type them in yourself, the end result is exactly the same—your phone gets the data it needs to connect.
No Network Connection After Installation
So, you’ve installed the eSIM, but your phone is stubbornly displaying "No Service." This is another classic issue that usually comes down to one or two settings you might have missed. Your eSIM is most likely installed just fine, but it just needs permission to connect.
First, the most important step: double-check that Data Roaming is turned ON for your travel eSIM. I know, it sounds wrong. We've all been trained to turn roaming off to avoid crazy charges. But for a travel eSIM to connect to local partner networks, it must be enabled for that specific line.
If that doesn’t do the trick, a simple restart often works wonders. Turning your phone off and on again forces it to search for and re-establish its connection with local cell towers. This simple reboot resolves the vast majority of connectivity problems. For more device-specific help, our guide to eSIM phone support can provide extra tips.
Burning Questions About Travel eSIMs
Okay, so you've got the basics down. You know what an eSIM is and how it saves you from those dreaded roaming bills. But a few questions are probably still rattling around in your head. Let's tackle the most common ones travelers ask before they make the switch.
Can I Use My eSIM and Regular SIM at the Same Time?
You bet. This is hands-down one of the best features for any traveler. Most modern phones that support eSIMs are Dual SIM devices, which means they can handle two lines at once.
This setup lets you keep your home number active on your physical SIM for things you can't miss, like calls from your bank or 2FA texts. At the same time, you can tell your phone to use your new travel eSIM for all mobile data. You get to browse maps, order a ride, and post photos without getting hit with a massive bill from your carrier back home.
It’s the perfect travel hack: your home line stays on for emergencies, while your travel eSIM does all the heavy data lifting on cheap, local networks.
What Happens When My eSIM Plan Runs Out?
When your data package is used up or the validity period ends, the eSIM simply goes dormant. It stops connecting to the network, and that's it—no surprise charges, no hidden fees. You’re always in control.
From there, you have two simple choices:
- Delete it: Just remove the inactive eSIM profile from your phone’s settings to keep things clean.
- Keep it: Some providers let you top up an existing eSIM profile, which is super convenient if you plan on returning to that country later.
Can I Move My eSIM to a New Phone?
This used to be a bit of a headache, but it’s getting way easier. It's not quite as simple as popping out a physical SIM card, but the days of needing to call customer support are fading fast.
Newer phones and operating systems have introduced quick transfer features that let you move an eSIM profile from your old phone to your new one in just a few taps. Support for this still depends on the provider, though, so it’s always smart to check their policy before you upgrade your device.
Are Travel eSIMs Just for Data?
The huge majority of travel eSIMs are data-only, and frankly, that's all most of us need. It gives you the connection you need for Google Maps, WhatsApp, Uber, and Instagram—the apps that really matter when you're abroad.
But what if you actually need a local phone number to make calls or send classic SMS texts? Some providers do offer plans that bundle in a voice and text allowance. You'll just need to read the plan details carefully before you buy to make sure it includes what you're looking for.
Ready to forget about roaming fees and get connected the second you land? Find the perfect plan for your next adventure on eSimGuide.com, where you can compare top providers for over 200 destinations. Explore travel eSIM plans now!


