How to Use eSIM When Traveling Your Complete Guide
Using an eSIM while traveling is pretty straightforward: you just download a digital data plan straight to your phone. This gets you instant internet access the moment you land in a new country.
The real win? You get to avoid those shockingly expensive roaming fees from your carrier back home and completely skip the hassle of hunting down a local shop to buy a physical SIM card.
What Is a Travel eSIM and Why Use One
Picture this: you land in Tokyo after a long flight. Before the cabin doors even open, your phone connects to the local 5G network. No fumbling with tiny plastic SIM cards. No panicking over a text from your home carrier warning you about $10-a-day roaming charges. That’s the magic of using an eSIM.
It’s a digital SIM that’s already built into your device, just waiting for you to activate a new data plan. And this isn't some niche tech anymore; it's rapidly becoming the standard. In fact, global eSIM-enabled device shipments are expected to hit 544 million units by 2025. That's fantastic news for anyone who travels internationally.
If you want to dive deeper into the nuts and bolts of the technology, we've broken down the key details in our guide.
The Core Benefits of an eSIM Abroad
The appeal of an eSIM for travel really comes down to three things: convenience, cost, and control.
You can buy and install your plan right from your couch before you even start packing, which guarantees you’ll be connected the second you land. It completely removes the stress of trying to find a SIM vendor in a chaotic airport where you might not speak the language.
The financial upside is huge, too. Instead of paying those exorbitant daily roaming fees, you’re buying affordable, local data packages. For instance, a 10 GB plan for a week in Europe might only set you back $20. A week of roaming, on the other hand, could easily cost you $70 or more.
An eSIM gives you the freedom to choose your connectivity. You can keep your primary number for calls and texts while using the eSIM's cheaper data for maps, browsing, and messaging apps.
How an eSIM Compares to Other Options
To really get why eSIMs are a game-changer, it helps to see how they stack up against the old-school methods. Each option has its place, but for the modern traveler, the eSIM almost always strikes the perfect balance. A physical SIM means you have to find a store, and international roaming is just notoriously expensive. An eSIM elegantly solves both of those problems.
eSIM vs Physical SIM vs Roaming: A Traveler's Comparison
Here’s a quick look at how these three connectivity options compare for a typical international trip.
| Feature | eSIM | Physical SIM | International Roaming |
|---|---|---|---|
| Setup | Instant digital download | Requires store visit & physical swap | Automatic, carrier-enabled |
| Cost | Low-cost, prepaid plans | Generally cheap for local data | Very expensive daily fees |
| Convenience | High (buy anytime, anywhere) | Low (find a store, possible language barrier) | High (no setup needed) |
| Flexibility | Easily switch plans & providers | Locked to one provider per card | Locked to your home carrier |
As you can see, the eSIM offers the best of both worlds—the ease of roaming without the wallet-crushing cost. It’s a clear winner for anyone looking for a smarter way to stay connected abroad.
Your Pre-Trip eSIM Preparation Checklist
A little bit of prep work before you fly can make all the difference between a smooth eSIM experience and a frustrating one. The last thing you want is to land, ready to explore, only to find out your phone isn't ready. Taking a few minutes to get these details sorted out at home will save you a massive headache abroad.
First things first, you need to confirm two critical details about your smartphone: Is it eSIM compatible, and is it unlocked? Most phones made in the last few years have eSIM capability, but the "unlocked" part is what trips people up.
A locked phone is tied to the carrier you bought it from, meaning it simply won't accept an eSIM from another provider. An unlocked phone, on the other hand, is free to connect to any network you choose—which is exactly what you need for a travel eSIM to work.
Confirm Your Phone Is Ready for Travel
Figuring out your phone's status is usually pretty simple.
On an iPhone, just navigate to Settings > General > About. Scroll down a bit, and you'll see a line item for "Carrier Lock." If it says "No SIM restrictions," you're golden.
For Android users, the path can vary a little depending on the manufacturer. It's typically somewhere under Settings > Network & Internet > SIMs. If you can't find an option to "Add eSIM" or add a new mobile plan, there's a good chance your device is locked.
Pro Tip: If you discover your phone is locked, don't panic. Call your current mobile provider and ask them to perform a "carrier unlock for international travel." Most will do this for free, especially if your phone is paid off. Just make sure you do this a few days before you leave, as it can sometimes take 24-48 hours to process.
Choosing the Perfect eSIM Plan
Once you know your phone is good to go, it's time for the fun part: picking your data plan. This isn't a one-size-fits-all decision; the best plan is the one that matches your specific itinerary.
Think about how you'll be traveling:
- Single-Country Stay: Heading to Italy for a week? A country-specific eSIM for Italy is almost always your cheapest and best bet.
- Regional Tour: If you're backpacking through Southeast Asia or hopping between a few European cities, a regional eSIM is a lifesaver. It gives you seamless data across multiple countries with just one plan.
- Global Adventure: For those epic, multi-continent trips, a global eSIM offers the ultimate convenience, though you might pay a little more per gigabyte for that flexibility.
This is where a good comparison tool is invaluable. Instead of bouncing between dozens of provider websites, you can see all your options in one place.
For example, using a comparison site like eSimGuide.com lets you instantly filter and compare plans side-by-side.
You can immediately see the price per day and the cost per gigabyte, making it incredibly easy to find the best value for your trip. This kind of data-driven approach means you're not just guessing—you're making an informed choice that saves you money. For more help, check out our guide on how to know if your phone supports eSIM.
Alright, you've done your homework and picked the perfect eSIM data plan for your trip. Now for the fun part: getting it onto your phone. The whole installation process is surprisingly painless, and once you do it, you'll wonder why you ever bothered with physical SIM cards.
The beauty of the eSIM is its flexibility. Providers know that not everyone is a tech wizard, so they usually give you a few different ways to get set up. It’s designed to be quick—most people are done in just a couple of minutes.
This little infographic breaks down the simple flow, from checking your phone's compatibility to getting your plan installed before you even pack your bags.
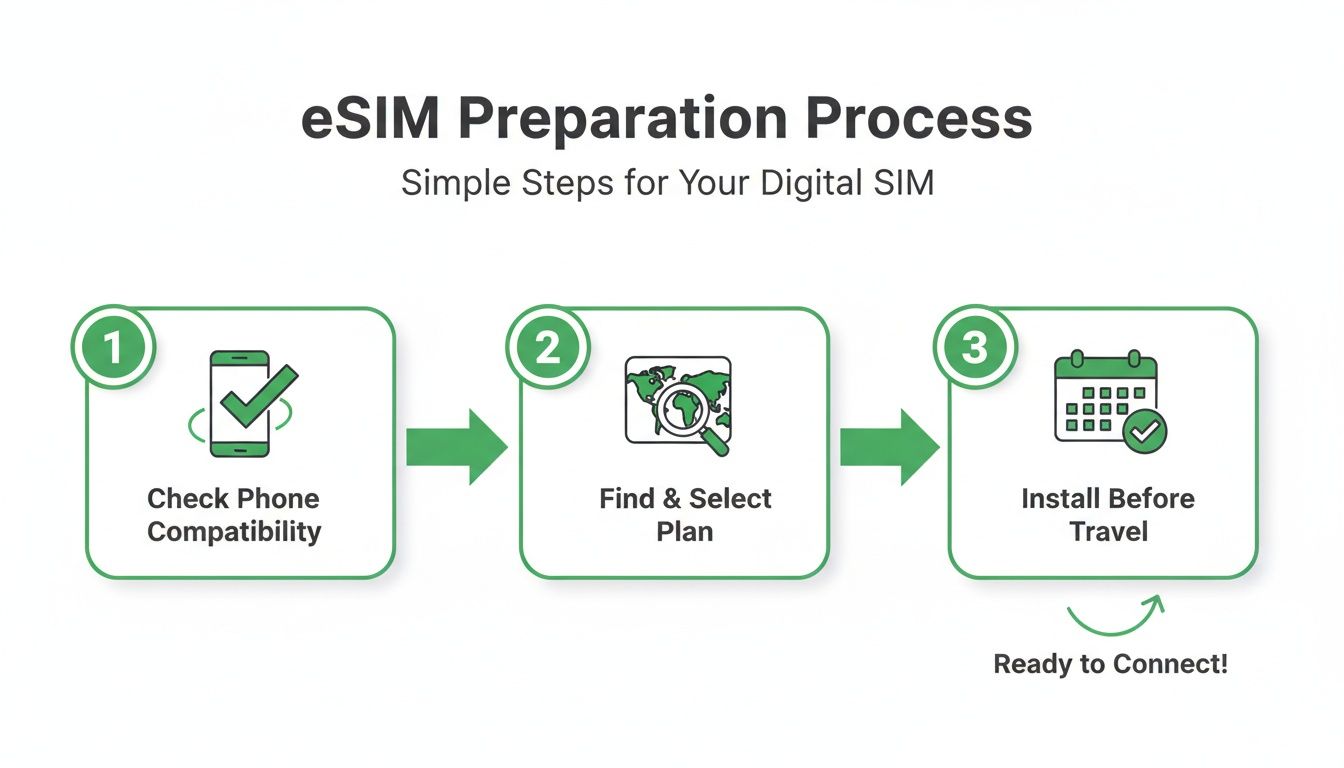
The key takeaway here is that "Install Early" step. Trust me, it's a game-changer for hitting the ground running.
Common eSIM Installation Methods
Once you've paid, your provider will typically steer you down one of three main paths to get your eSIM working.
- Scanning a QR Code: This is the classic and most common method. You'll get an email with a unique QR code. Just head into your phone's cellular settings, tap "Add eSIM," and point your camera at the code. Easy.
- Direct In-App Installation: Many of the big names like Airalo or Holafly have made this even simpler. You buy the plan right inside their app, and a big "Install eSIM" button pops up. A few taps later, you're all set—no codes or emails required.
- Manual Entry: If you can't scan the QR code for some reason (maybe your screen is cracked or you're on a different device), don't worry. Your provider will also give you the details to type in yourself. It's just a matter of copying and pasting an address and activation code into your phone's settings. It's a solid backup plan.
The Most Important Installation Tip
Here’s a piece of advice that seasoned travelers live by: install your eSIM at home before you leave, but hold off on activating it until you land. The installation itself needs a steady Wi-Fi connection, which is a lot easier to find in your living room than in a chaotic airport terminal.
By installing early, you get everything set up on your own time. The plan’s validity period—whether it's 7 days or 30—only begins once the eSIM connects to a network in your destination country. This ensures you get every single minute and megabyte you paid for.
This little pre-trip ritual is a huge win for budget travelers. The eSIM market is exploding for a reason—it turns outrageous roaming fees into pocket change. This growth is driven by travelers like us, with the eSIM industry projected to jump from $11.74 billion in 2025 to $35.7 billion by 2033. And it's incredibly efficient; activation takes less than two minutes for about 90% of users, giving you local data rates for a fraction of what your home carrier would charge.
With your eSIM installed and ready to go, you can step off the plane, flip it on, and be online before your bags even make it to the carousel. If you're still weighing your options, you might also want to check out our deep dive into the best eSIM choices for international travel.
Managing Your eSIMs While on the Road
Once your plane touches down, it’s time to bring your travel eSIM to life. The real magic here isn't just the cheap data; it’s being able to run two plans on one phone at the same time. This dual-SIM capability is what separates savvy travelers from those who come home to massive roaming bills.
You can set your new travel eSIM as your main pipeline for mobile data, giving you instant access to Google Maps, Uber, and Instagram at local rates. Meanwhile, your home number can stay active for essential calls and texts, like those two-factor authentication codes from your bank. It’s genuinely the best of both worlds.
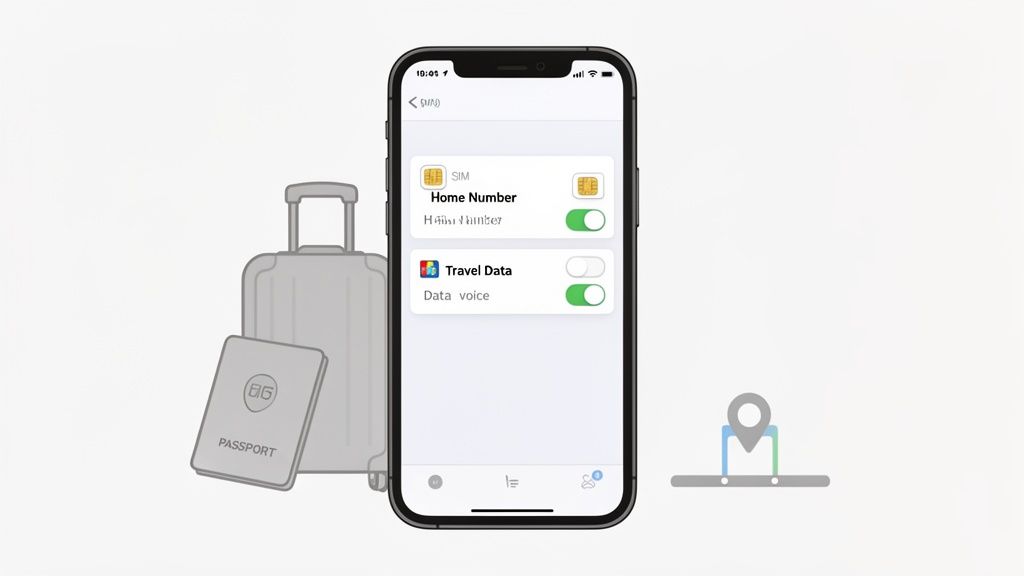
Configuring Your Phone for Dual-SIM Use
First things first: label your cellular plans. This sounds minor, but it's a crucial step to avoid confusion and accidental charges later on.
Dive into your phone’s cellular settings and give each plan a clear name. For example, you can rename your home plan to “Home Number” and your travel eSIM to something obvious like “Europe Data” or “Japan Trip.” This simple bit of housekeeping prevents you from accidentally turning off the wrong line or burning through expensive home data.
Next, you need to assign roles to each plan. A typical setup for international travel looks like this:
- Default Voice Line: Keep this set to your “Home Number.” This ensures you can still receive important calls on your main number. Just remember, answering those calls might trigger roaming charges from your home carrier.
- iMessage & FaceTime: You’ll also want to keep this assigned to your “Home Number” so your contacts can reach you without a hitch.
- Cellular Data: This is the most important one. Switch this over to your new travel eSIM (e.g., “Europe Data”). Doing this tells your phone to funnel all internet usage through the cheap local plan you just bought.
By tweaking these settings, you're essentially telling your phone: "Use my cheap travel plan for all things internet, but keep my regular number active for important calls and texts." This is the core strategy for using an eSIM effectively while traveling.
Monitoring Data Usage and Topping Up
Keeping an eye on your data consumption is key to avoiding surprises. You don’t want to run out of gigabytes while trying to navigate a new city. Luckily, tracking your usage is pretty straightforward.
Most eSIM providers have a dedicated app that shows your remaining data in real-time, which is usually the most accurate way to check. Your phone’s built-in cellular settings can also track usage, but for that to be accurate, you have to remember to reset the statistics at the start of your trip.
This kind of on-the-go management is a lifesaver for digital nomads and remote workers who depend on a stable connection for everything from Zoom calls in Lisbon to Slack messages in Lima. With the number of eSIM devices projected to hit 1.5 billion by the end of 2026, this flexibility is quickly becoming the new standard. You can learn more about the advancements driving this growth.
If you find yourself running low, don't panic. Adding more data is just as easy as the initial purchase. Most provider apps have a "Top Up" or "Add Data" button that lets you buy another package on the fly. You can add more data to your current plan or even buy a totally new eSIM if you find a better deal—all without fiddling with a single physical SIM card.
Troubleshooting Common eSIM Travel Issues
It happens to the best of us. You land, switch on your phone, and… nothing. Your eSIM isn’t connecting, and a wave of travel stress washes over you. But before you start digging for a customer support number, take a deep breath. The fix is almost always something simple you can handle right from your phone's settings.
In my experience, most connection problems aren't because the eSIM is faulty. It's usually just a minor setting that got overlooked during the setup whirlwind. A few quick checks will get you online in minutes.
Initial Checks for No Connection
When your eSIM plays dead on arrival, don't panic. Start with the most common culprits, because chances are, one of them is the issue. These steps resolve the vast majority of "no service" headaches travelers run into.
First, pop into your phone's cellular or mobile settings and make sure your travel eSIM is actually switched on. It sounds obvious, but it’s an easy thing to miss when you're tired and just want to get to your hotel.
Next up is the big one: check that Data Roaming is enabled for your travel eSIM. I know, it feels wrong. You bought an eSIM specifically to avoid crazy roaming charges. But for a travel eSIM to work, it must have this permission to connect to local partner networks.
Think of it this way: your travel eSIM works by "roaming" onto approved local networks in the country you're visiting. If you turn off data roaming for that specific eSIM line, you’re basically telling your phone not to connect to the very towers it needs to get you online.
Tackling Painfully Slow Data Speeds
What if you're connected, but your data is crawling at a snail's pace? Before you blame the eSIM provider, the problem might just be the network your phone chose. Phones usually connect automatically, but they don't always pick the strongest signal available.
You can take the wheel here. Head back to your cellular settings and find the "Network Selection" menu. Switch it from "Automatic" to "Manual," and your phone will scan for all available local carriers. Pick a different one from the list—you might be surprised to find that another provider has a much stronger 5G or 4G LTE signal right where you're standing.
A Quick Troubleshooting Cheatsheet
Even seasoned travelers hit a snag now and then. This table covers the most common issues and the first things you should try to resolve them quickly.
Quick Fixes for Common eSIM Problems
| Problem | First Action Step | Second Action Step |
|---|---|---|
| No Internet Connection | Verify the travel eSIM is turned on in settings. | Confirm "Data Roaming" is enabled for the eSIM. |
| Slow Data Speeds | Restart your phone to refresh the network connection. | Manually select a different network provider. |
| QR Code Won't Scan | Increase your screen's brightness and clean the camera lens. | Use the manual activation details provided by your eSIM company. |
Running through these steps will solve most problems you'll face, letting you get back to enjoying your trip instead of wrestling with a support chat. The trick is to always start with the simplest fix before jumping to conclusions.
Frequently Asked Questions About Travel eSIMs
Even after seeing all the benefits, it's totally normal to have a few questions before ditching your physical SIM for the first time. Let's tackle some of the most common things travelers wonder about when using an eSIM abroad. Getting these sorted will help you feel confident managing your data like a seasoned pro.
What Happens to My Primary Phone Number?
This is, without a doubt, the number one question people ask. The answer is simple and one of the best parts about eSIMs: nothing at all happens to your primary number. It stays active on your phone, working right alongside your new travel eSIM.
This is possible because of your phone's dual-SIM capability. You can keep receiving important calls and texts (like those two-factor authentication codes from your bank) on your regular number. Meanwhile, you'll use the travel eSIM for all your mobile data, saving you from outrageous roaming fees. Just make sure you switch your phone’s cellular data setting to the travel eSIM plan once you land.
Can I Make Calls and Texts with a Travel eSIM?
This really depends on the specific plan you buy. The vast majority of travel eSIMs are data-only. This makes perfect sense when you think about it—most of us now use apps like WhatsApp, Telegram, or FaceTime Audio to communicate, and all of those run on data.
However, some providers do offer plans that come with a local phone number for making actual calls and sending SMS texts. These are a bit less common and can cost more, but they are incredibly handy if you need to call a local restaurant for a reservation or confirm a tour booking. Always double-check the plan details before you hit "buy."
Traveler's Tip: Even with a data-only eSIM, you can still call regular phone numbers using services like Skype or Google Voice. Just add a little bit of credit to your account, and you can call landlines and mobile phones anywhere in the world for just a few cents a minute, all running over your eSIM’s data connection.
How Do I Know If My Phone Is Unlocked?
This one is critical. For a travel eSIM to work, your phone must be unlocked. A "locked" phone is tied to the carrier you bought it from and won't accept a SIM or eSIM from anyone else.
The easiest way to check is right in your phone's settings.
- For iPhone users: Go to
Settings > General > About. Scroll down until you see "Carrier Lock." If it says "No SIM restrictions," you're good to go. - For Android users: This can vary a bit by manufacturer, but you'll usually find it under
Settings > Network & Internet > SIMs. If you see an option to "Add eSIM" or "Add a network," your phone is almost certainly unlocked.
If you discover your phone is locked, you’ll need to contact your home carrier and ask them to unlock it before your trip.
What If I Get a New Phone?
Transferring your main, primary eSIM to a new phone is a process you'd handle through your home carrier. Your travel eSIM, however, is a completely different story.
Most travel eSIMs are designed for a single installation on one device and cannot be moved from one phone to another. If you get a new phone halfway through your vacation, you would unfortunately have to buy and install a brand new travel eSIM on that device. Because of this, it's always best to make sure the phone you start your trip with is the one you plan to use all the way through.
Ready to find the perfect data plan for your next adventure without all the guesswork? At eSimGuide.com, we do the heavy lifting by comparing plans from over 20 top providers. We help you find the best deal in minutes so you can stop overpaying for roaming and start traveling smarter.
Find your ideal travel eSIM at https://esimguide.com.


